GG修改器破解版下载地址:https://ghb2023zs.bj.bcebos.com/gg/xgq/ggxgq?GGXGQ
大家好,今天小编为大家分享关于GG免root框架修改器64位的内容,赶快来一起来看看吧。
export ES_HOME=/software/elasticsearch-8.1.0

export ES_JAVA_HOME=/software/jdk-17.0.2
useradd elastic

chown elastic /software/elasticsearch-8.1.0 -R
查看当前用户文件数限制

ulimit -n
vi /etc/security/limits.conf 文件最后添加两行
elastic soft nofile 65536
elastic hard nofile 65536
将elastic用户的文件数限制调整为65536
vi /etc/sysctl.conf 文件最后添加一行
vm.max_map_count=655360
使用sysctl -p使系统配置生效
vi config/elasticsearch.yml

修改两项host

network.host: 192.168.91.133

discovery.seed_hosts: ["192.168.91.133"]
并在文件最后添加一行
ingest.geoip.downloader.enabled: false
su elastic

cd /software/elasticsearch-8.1.0

./bin/elasticsearch
首次启动后控制台会打印出一些预设置的log信息,以及会在elasticsearch.yml配置文件的的最后面增加SECURITY相关配置,可以不用理会,因为需要使用时可用脚本工具去修改默认生成的一些配置信息;
第一次启动完成后会自动生成一些信息,接下来修改一下默认密码
bin/elasticsearch-reset-password --username elastic -i

elastic8888
xpack.security.http.ssl:

  enabled: false
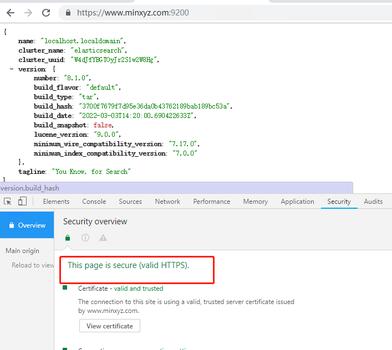
curl -u elastic:elastic8888 http://192.168.91.133:9200

{

  "name" : "localhost.localdomain",

  "cluster_name" : "elasticsearch",

  "cluster_uuid" : "W4dJfYBGTOyJr2S1w2W8Hg",

  "version" : {

    "number" : "8.1.0",

    "build_flavor" : "default",

    "build_type" : "tar",

    "build_hash" : "3700f7679f7d95e36da0b43762189bab189bc53a",

    "build_date" : "2022-03-03T14:20:00.690422633Z",

    "build_snapshot" : false,

    "lucene_version" : "9.0.0",

    "minimum_patibility_version" : "7.17.0",

    "minimum_patibility_version" : "7.0.0"

  },

  "tagline" : "You Know, for Search"

}
此时是未开启ssl的情况下可以正常访问,同时也可以开启ssl完成请求
打开config/elasticsearch.yml中可以看到配置项xpack.security.http.ssl.keystore.path: certs/http.p12,此http.p12证书为默认生成的,使用脚本工具重新生成一份替换它,生成命令如下
./bin/elasticsearch-certutil http
Generate a CSR? [y/N] N
Use an existing CA? [y/N] N
Do you wish to change any of these options? [y/N] y
CA Name [CN=Elasticsearch HTTP CA] www.
CA password: [<ENTER> for none] 123456
Repeat password to confirm: 123456
For how long should your certificate be valid? [5y] [ENTER]
Generate a certificate per node? [y/N]N
Enter all the hostnames that you need, one per line.
When you are done, press <ENTER> once more to move on to the next step.
www.
You entered the following hostnames.
- www.
Is this correct [Y/n]Y
Key Name: www.
Subject DN: CN=www, DC=minxyz,
Key Size: 2048
Do you wish to change any of these options? [y/N]N
If you wish to use a blank password, simply press <enter> at the prompt below.
Provide a password for the "http.p12" file: [<ENTER> for none] 123456
Repeat password to confirm: 123456
What filename should be used for the output zip file? [/software/elasticsearch-8.1.0/elasticsearch-ssl-http.zip] [ENTER]
Zip file written to /software/elasticsearch-8.1.0/elasticsearch-ssl-http.zip
解压elasticsearch-ssl-http.zip后,在目录elasticsearch中可以看到新生成的文件http.p12,将其替换掉config/cert/http.p12,由于生成此证书时密码为123456,所以需要重新设置keystore的密码(需注意不是在配置文件上添加密码配置项),命令如下
./bin/elasticsearch-keystore add "xpack.security.http.ssl.keystore.secure_password"
重新打开ssl配置
xpack.security.http.ssl:

  enabled: true
配置hosts为192.168.91.133 www.(此域名为任意定义的),重启elasticsearch,此时需要使用https来访问ES,可以先增加-k参数允许不使用证书连接到SSL站点(若浏览器可以强制访问不安全的地址)
curl -k -u elastic:elastic8888 https://www.:9200

{

  "name" : "localhost.localdomain",

  "cluster_name" : "elasticsearch",

  "cluster_uuid" : "W4dJfYBGTOyJr2S1w2W8Hg",

  "version" : {

    "number" : "8.1.0",

    "build_flavor" : "default",

    "build_type" : "tar",

    "build_hash" : "3700f7679f7d95e36da0b43762189bab189bc53a",

    "build_date" : "2022-03-03T14:20:00.690422633Z",

    "build_snapshot" : false,

    "lucene_version" : "9.0.0",

    "minimum_patibility_version" : "7.17.0",

    "minimum_patibility_version" : "7.0.0"

  },

  "tagline" : "You Know, for Search"

}
若需要安全访问,需要增加证书配置,通过以下命令生成http.pem后,使用http.pem证书完成https请求访问
openssl pkcs12 -nodes -in http.p12 -out http.pem

curl --cert ./http.pem --cacert ./http.pem -u elastic:elastic8888 https://www.:9200
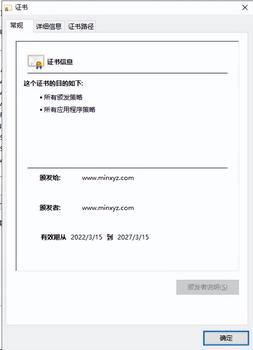
在浏览器上需要安全访问,可将http.p12证书安装到根证书目录下之后访问
由于直接使用curl操作相对较麻烦,临时扩展定义一个ecurl别名,如下(后面即可用ecurl简化操作)
alias ecurl=’curl --cert ./http.pem --cacert ./http.pem -u elastic:elastic8888’
ecurl https://www.:9200
ecurl https://www.:9200/_cat/indices?v
ecurl -X PUT https://www.:9200/user-index
ecurl -X PUT -H "content-type:application/json;charset=utf-8" https://www.:9200/user-index/_settings -d "{"number_of_replicas": 0}"
ecurl https://www.:9200/user-index/_mapping?pretty
ecurl -X POST --cert ./http.pem --cacert ./http.pem -u elastic:elastic8888 -H "content-type:application/json;charset=utf-8" https://www.:9200/user-index/_mapping -d

"{

     "properties": {

         "name": {

             "type": "keyword"

         },

         "type": {

             "type": "integer"

         },

         "content": {

             "type": "text"

         }

     }

 }"
ecurl -X POST -H "content-type:application/json;charset=utf-8" https://www.:9200/user-index/_create/1 -d "{"name":"测试姓名","type":100,"content":"测试永远滴神啊。。。"}"
ecurl https://www.:9200/user-index/_doc/1?pretty

或

ecurl https://www.:9200/user-index/_search?q=_id:1
ecurl -X POST -H "Content-Type:application/json;charset=UTF-8" "https://www.:9200/user-index/_search?pretty" -d "{"query":{"match_all":{}}}"
ecurl -X POST -H "content-type:application/json;charset=utf-8" https://www.:9200/user-index/_search?pretty -d

"{

    "query": {

        "match": {

            "content": "永远滴神"

        }

    }

}"
ecurl -X DELETE https://www.:9200/user-index/_doc/1?pretty
ecurl https://www.:9200/_settings/_all?pretty

ecurl https://www.:9200/user-index/_settings?pretty
创建索引别名

ecurl -X POST -H "content-type:application/json;charset=utf-8" https://www.:9200/_aliases -d’

{

    "actions": [{

            "add": {

                "index": "test-create-3",

                "alias": "article-index-master"

            }

        }

    ]

}

’
查看索引别名
ecurl https://www.:9200/_aliases?pretty
删除索引别名
ecurl -X POST https://www.:9200/_aliases -H ’Content-Type: application/json’ -d’
{
"actions": [
{
"remove": {
"index": "test-create-3",
"aliases": "article-index-master"
}
}
]
}
’
ecurl -X DELETE https://www.:9200/user-index
ecurl https://www.:9200/_cat/shards?v
ecurl https://www.:9200/_cluster/health?pretty=true
ecurl -X GET "https://www.:9200/_cluster/allocation/explain?pretty" -H ’Content-Type: application/json’ -d’

{

  "index": "user-index",

  "shard": 0,

  "primary": false,

  "current_node": "localhost.localdomain"

}

’
ecurl https://www.:9200/_cat/allocation?v
安装中文分词插件sudo bin/elasticsearch-plugin install analysis-,安装成功后重启es
ecurl -X POST  -H ’Content-Type: application/json’ https://www.:9200/_analyze?pretty -d’

{

	"analyzer":"",

	"text":"测试永远滴神啊。。。"

}’
./elasticsearch-plugin install https:///medcl/elasticsearch-analysis-ik/releases/download/v8.1.0/elasticsearch-analysis-ik-8.1.0.zip
比如要将“永远滴神”定义为一个词,需要在配置IKAnalyzer.cfg.xml中指定<entry key=”ext_dict”>customer.dic</entry>,然后创建文件customer.dic,并添加一行“永远滴神”,重启后再次访问即可看到分词结果
 ecurl -X POST  -H ’Content-Type: application/json’ https://www.:9200/_analyze?pretty -d’

> {

> "analyzer":"ik_smart",

> "text":"测试永远滴神啊。。。"

> }’
{
"tokens" : [
{
"token" : "测试",
"start_offset" : 0,
"end_offset" : 2,
"type" : "CN_WORD",
"position" : 0
},
{
"token" : "永远滴神",
"start_offset" : 2,
"end_offset" : 6,
"type" : "CN_WORD",
"position" : 1
},
{
"token" : "啊",
"start_offset" : 6,
"end_offset" : 7,
"type" : "CN_CHAR",
"position" : 2
}
]
}
以上就是关于GG免root框架修改器64位的全部内容,感谢大家的浏览观看,如果你喜欢本站的文章可以CTRL+D收藏哦。

gg修改器显示未root_gg修改器显示文件未找到 大小:5.65MB11,028人安装 大家好,今天小编为大家分享关于gg修改器显示未root_gg修改器显示文件未找到的内容……
下载
GG修改器root_gg修改器root框架下载教程 大小:11.28MB10,836人安装 大家好,今天小编为大家分享关于GG修改器root_gg修改器root框架下载教程的内容,赶……
下载
gg修改器真正的免root权限,提升游戏体验gg修改器真正的免root权限 大小:15.67MB9,885人安装 对于很多游戏玩家来说,游戏体验是非常重要的,但随着一些游戏强制要求root权限才能……
下载
gg修改器不root下载, gg修改器不root下载:超越修改游戏的限制 大小:19.18MB9,631人安装 你是否曾经因为游戏中的一些限制而感到无比沮丧,比如限制了你的金币、道具、技能等……
下载
gg修改器免root所有软件_gg修改器免root版 大小:6.81MB10,775人安装 大家好,今天小编为大家分享关于gg修改器免root所有软件_gg修改器免root版的内容,……
下载
最新gg修改器怎么下,最新gg修改器怎么下? 大小:11.34MB9,506人安装 最新gg修改器是一款功能强大而且非常实用的游戏辅助工具,可以帮助玩家实现更高效的……
下载
迷你世界gg修改器中文版,迷你世界GG修改器中文版:一款让你畅游迷你世界的神器 大小:3.11MB9,537人安装 随着迷你世界游戏的愈来愈流行,玩家们也越来越需要一些辅助工具来提高游戏的体验。……
下载
gg游戏修改器防检测版,GG游戏修改器防检测版–最好的游戏辅助工具 大小:15.59MB9,410人安装 GG游戏修改器防检测版是目前市场上最流行和最受欢迎的游戏辅助工具之一。玩家可以使……
下载
gg修改器框架官网下载中文_GG修改器框架下载 大小:12.98MB10,912人安装 大家好,今天小编为大家分享关于gg修改器框架官网下载中文_GG修改器框架下载的内容……
下载
gg修改器中文版8.9_GG修改器中文版官网 大小:13.70MB10,985人安装 大家好,今天小编为大家分享关于gg修改器中文版8.9_GG修改器中文版官网的内容,赶快……
下载