GG修改器破解版下载地址:https://ghb2023zs.bj.bcebos.com/gg/xgq/ggxgq?GGXGQ
大家好,今天小编为大家分享关于gg修改器无毒版免root_gg修改器中文破解版的内容,赶快来一起来看看吧。
CMDB (配置管理数据库) API 调用
PUBLIC/PRIVATE CLOUD API调用
USER → Ansible Playbook → Ansibile
7、利用ansible实现管理的方式:
Ad-Hoc即ansible命令,主要用于临时命令使用场景
Ansible-playbook主要用于长期规划好的,大型项目的场景,需要有前提的规划
Ansible-playbook (剧本) 执行过程:
Ansible主要操作对象:
注意事项:
➢执行ansible的主机一般称为主控端,中控,master或堡垒机
➢主控端Python版本需要2.6或以上
➢被控端Python版本小于2.4需要安装python-simplejson
➢被控端如开启SELinux需要安装libselinux-python
➢windows不能做为主控端
1>rpm包安装:EPEL源
yum install ansible -y
2>编译安装:
yum -y install python-jinja2 PyYAML python-paramiko python-babel python-crypto

tar xf ansible-1.5.4.tar.gz

cd ansible-1.5.4

python setup.py build

python setup.py install

mkdir /etc/ansible

cp -r examples/* /etc/ansible
3>Git方式:
git clone git:///ansible/ansible.git --recursive

cd ./ansible

source ./hacking/env-setup
4>pip安装:pip是安装Python包的管理器,类似yum
yum install python-pip python-devel

yum install gcc glibc-devel zibl-devel rpm-bulid openssl-devel

pip install --upgrade pip

pip install ansible --upgrade
5>确认安装: ansible –version
1>配置文件
2>程序
3>主机清单inventory
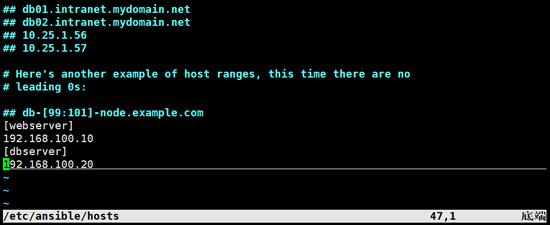
4>/etc/ansible/hosts文件格式
inventory文件遵循INI文件风格,中括号中的字符为组名。可以将同一个主机同时归并到多个不同的组中;此外,当如若目标主机使用了非默认的SSH端口,还可以在主机名称之后使用冒号加端口号来标明
[root@ansible ~]#vim /etc/ansible/hosts
也可以配置域名解析,使用域名代替ip,如果ssh默认端口号有改动不是22端口,则 ip/域名:端口
Ansible配置文件 Ansible配置文件/etc/ansible/ansible.cfg (一般保持默认)
[defaults]

#inventory = /etc/ansible/hosts     #主机列表配置文件

#library = /usr/share/my_modules/   #库文件存放目录

#remote_tmp = $HOME/.ansible/tmp    #临时py命令文件存放在远程主机目录

#local_tmp = $HOME/.ansible/tmp     #本机的临时命令执行目录

#forks = 5                          #默认并发数

#sudo_user = root                   #默认sudo用户

#ask_sudo_pass = True               #每次执行ansible命令是否询问ssh密码

#ask_pass = True

#remote_port = 22

#host_key_checking = False          #检查对应服务器的host_key,建议取消注释,要不然得先建立连接(/root/.ssh/known_hosts)Ansible才能连接成功

#log_path=/var/log/ansible.log      #日志文件
Ansible配置文件保持默认,建议开启:host_key_checking = False,log_path=/var/log/ansible.log
示例:
ansible-doc -l      列出所有模块

ansible-doc ping    查看指定模块帮助用法

ansible-doc -s ping 查看指定模块帮助用法(短帮助)
ansible通过ssh实现配置管理、应用部署、任务执行等功能,建议配置ansible端能基于密钥认证的方式联系各被管理节点
ansible <host-pattern> [-m module_name] [-a args]
–version显示版本
-m module指定模块,默认为command
-v详细过程-vv -vvv更详细
–list-hosts显示主机列表,可简写-list
-k, –ask-pass提示输入ssh连接密码,默认Key验证
-K, –ask-e-pass提示输入sudo时的口令
-C, –check检查,并不执行
-T, –timeout=TIMEOUT执行命令的超时时间,默认10s
-u, –user=REMOTE_USER执行远程执行的用户
-b, –e代替旧版的sudo切换
[root@ansible ~]#ansible 192.168.100.10 -m ping -k    #-m:指定模块,-k:指定k口令验证

SSH password:

192.168.100.10 | SUCCESS => {

    "ansible_facts": {

        "discovered_interpreter_python": "/usr/bin/python"

    },

    "changed": false,

    "ping": "pong"

}
[root@ansible ~]#ansible all --list #列出主机列表
hosts (2):
192.168.100.10
192.168.100.20
[root@ansible ~]#ansible all -m ping -u yang -k #以yang用户身份执行ping
SSH password:
192.168.100.20 | SUCCESS => {
"ansible_facts": {
"discovered_interpreter_python": "/usr/bin/python"
},
"changed": false,
"ping": "pong"
}
192.168.100.10 | SUCCESS => {
"ansible_facts": {
"discovered_interpreter_python": "/usr/bin/python"
},
"changed": false,
"ping": "pong"
}
[root@ansible ~]#ansible all -k -u yang -b -K -mand -a ’ls /root’ #以yang用户身份执行ls /root,-b即sudo切换身份,-K输入sudo时的口令
SSH password:
BECOME password[defaults to SSH password]:
192.168.100.20 | CHANGED | rc=0 >>
anaconda-ks.cfg
jdk-8u221-linux-x64.tar.gz
192.168.100.10 | CHANGED | rc=0 >>
anaconda-ks.cfg
设置基于key验证:
[root@ansible ~]#ssh-keygen
Generating public/private rsa key pair.
Enter file in which to save the key (/root/.ssh/id_rsa): #设置空,为了安全建议进行进一步设置
Enter passphrase (empty for no passphrase): #设置空
Enter same passphrase again: #设置空
Your identification has been saved in /root/.ssh/id_rsa.
Your public key has been saved in /root/.ssh/id_rsa.pub.
The key fingerprint is:
SHA256:nHRFKqBQ/jceNpkOFfoVLKbE+hVchYw25FKG8m3eFeM root@ansible.localdomain
The key’s randomart image is:
+---[RSA 2048]----+
| .....+==o++ |
| o..+*O.++o |
| o=o==++. o |
| ..o*+B E |
| .o+S. . |
| .*.+. |
| o |
| |
| |
+----[SHA256]-----+
[root@ansible ~]#ssh-copy-id 192.168.100.10 #拷贝至192.168.100.10
/usr/bin/ssh-copy-id: INFO: Source of key(s) to be installed: "/root/.ssh/id_rsa.pub"
/usr/bin/ssh-copy-id: INFO: attempting to log in with the new key(s), to filter out any that are already installed
/usr/bin/ssh-copy-id: INFO: 1 key(s) remain to be installed -- if you are prompted now it is to install the new keys
root@192.168.100.10’s password:
Number of key(s) added: 1
Now try logging into the machine, with: "ssh ’192.168.100.10’"
and check to make sure that only the key(s) you wanted were added.
[root@ansible ~]#ssh-copy-id 192.168.100.20 #拷贝至192.168.100.20
/usr/bin/ssh-copy-id: INFO: Source of key(s) to be installed: "/root/.ssh/id_rsa.pub"
/usr/bin/ssh-copy-id: INFO: attempting to log in with the new key(s), to filter out any that are already installed
/usr/bin/ssh-copy-id: INFO: 1 key(s) remain to be installed -- if you are prompted now it is to install the new keys
root@192.168.100.20’s password:
Number of key(s) added: 1
Now try logging into the machine, with: "ssh ’192.168.100.20’"
and check to make sure that only the key(s) you wanted were added.
[root@ansible ~]#ansible all -m ping #基于key验证不需要在输入key口令
192.168.100.20 | SUCCESS => {
"ansible_facts": {
"discovered_interpreter_python": "/usr/bin/python"
},
"changed": false,
"ping": "pong"
}
192.168.100.10 | SUCCESS => {
"ansible_facts": {
"discovered_interpreter_python": "/usr/bin/python"
},
"changed": false,
"ping": "pong"
}
[root@ansible ~]#ansible all --list

  hosts (2):

    192.168.100.10

    192.168.100.20
*:通配符
ansible “*” -m ping
ansible 192.168.100.* -m ping
ansible “*server” -m ping
[root@ansible ~]#ansible *server -m ping

192.168.100.20 | SUCCESS => {

    "ansible_facts": {

        "discovered_interpreter_python": "/usr/bin/python"

    },

    "changed": false,

    "ping": "pong"

}

192.168.100.10 | SUCCESS => {

    "ansible_facts": {

        "discovered_interpreter_python": "/usr/bin/python"

    },

    "changed": false,

    "ping": "pong"

}
或关系
ansible “webserver:dbserver” -m ping
ansible “192.168.100.10:192.168.100.20” -m ping
[root@ansible ~]#ansible "webserver:dbserver" -m ping

192.168.100.20 | SUCCESS => {

    "ansible_facts": {

        "discovered_interpreter_python": "/usr/bin/python"

    },

    "changed": false,

    "ping": "pong"

}

192.168.100.10 | SUCCESS => {

    "ansible_facts": {

        "discovered_interpreter_python": "/usr/bin/python"

    },

    "changed": false,

    "ping": "pong"

}
逻辑与
ansible “webserver:&dbserver” -m ping
在webserver组并且在dbserver组中的主机
逻辑非
ansible ’webserver:!dbserver’ -m ping
在webserver组,但不在dbserver组中的主机
注意:此处为单引号
综合逻辑
ansible ’webserver:dbserver:&appserver:!ftpserver’ -m ping
正则表达式
ansible “webserver:&dbserver” -m ping
ansible“ ~(web|db).*.yang.com”-m ping
1.加载自己的配置文件默认/etc/ansible/ansible.cfg
2.加载自己对应的模块文件,如command
3.通过ansible将模块或命令生成对应的临时py文件,并将该文件传输至远程服务器的对应执行用户$HOME/.ansible/tmp/ansible-tmp-数字/XXX.PY文件
4.给文件+x执行
5.执行并返回结果
6.删除临时py文件,sleep 0退出
执行状态:
绿色:执行成功并且不需要做改变的操作
黄色:执行成功并且对目标主机做变更
红色:执行失败
各种模块的使用,可以ansible-doc -s service先查看帮助,再进行使用 1&mand模块:在远程主机执行命令,默认模块,可忽略-m选项
[root@ansible ~]#ansible all -mand -a ’hostname’

192.168.100.20 | CHANGED | rc=0 >>

node-2

192.168.100.10 | CHANGED | rc=0 >>

node-1

[root@ansible ~]#ansible all -mand -a ’echo yang | passwd --stdin yang’

192.168.100.20 | CHANGED | rc=0 >>

yang | passwd --stdin yang    #没有成功,当字符串打印出来了

192.168.100.10 | CHANGED | rc=0 >>

yang | passwd --stdin yang    #没有成功,当字符串打印出来了
此命令不支持$VARNAME < > | ; & 等,需要使用shelI模块实现
2>shell模块:和command相似,用shell执行命令
[root@ansible ~]#ansible all -m shell -a ’echo yang | passwd --stdin yang’

192.168.100.20 | CHANGED | rc=0 >>

更改用户 yang 的密码 。

passwd:所有的身份验证令牌已经成功更新。

192.168.100.10 | CHANGED | rc=0 >>

更改用户 yang 的密码 。

passwd:所有的身份验证令牌已经成功更新。
调用bash执行命令类似cat /tmp/stanley.md | awk -F’|’ ’{print $1,$2}’ &>/tmp/example.txt 这些复杂命令,即使使用shell也可能会失败,解决办法:写到脚本,copy到远程,执行,再把需要的结果拉回执行命令的机器
3>script模块:运行脚本 -a “/PATH/TO/SCRIPT_FILE”
[root@ansible ~]#./hello.sh     #当前Ansible机器上的脚本:实现打印hello,输出主机名

hello

my hostname is ansible.localdomain

[root@ansible ~]#ansible all -m script -a ’/root/hello.sh’

192.168.100.20 | CHANGED => {

    "changed": true,

    "rc": 0,

    "stderr": "Shared connection to 192.168.100.20 closed.

",

    "stderr_lines": [

        "Shared connection to 192.168.100.20 closed."

    ],

    "stdout": "hello

my hostname is node2.localdomain

",

    "stdout_lines": [

        "hello",

        "my hostname is node2.localdomain"

    ]

}

192.168.100.10 | CHANGED => {

    "changed": true,

    "rc": 0,

    "stderr": "Shared connection to 192.168.100.10 closed.

",

    "stderr_lines": [

        "Shared connection to 192.168.100.10 closed."

    ],

    "stdout": "hello

my hostname is node1.localdomain

",

    "stdout_lines": [

        "hello",

        "my hostname is node1.localdomain"

    ]

}
4>copy模块:从服务器复制文件到客户端
[root@ansible ~]#ansible all -m copy -a ’src=/root/hello.sh dest=/root/’    #src:指定源文件  dest:指定目标文件存放目录

192.168.100.20 | CHANGED => {

    "ansible_facts": {

        "discovered_interpreter_python": "/usr/bin/python"

    },

    "changed": true,

    "checksum": "63ff849c6cde8cd1eef04e0472e832d8407eca00",

    "dest": "/root/hello.sh",

    "gid": 0,

    "group": "root",

    "md5sum": "c426adca4193658a2183f59d726cc2dc",

    "mode": "0644",

    "owner": "root",

    "size": 58,

    "src": "/root/.ansible/tmp/ansible-tmp-1584450232.18-80008690840068/source",

    "state": "file",

    "uid": 0

}

192.168.100.10 | CHANGED => {

    "ansible_facts": {

        "discovered_interpreter_python": "/usr/bin/python"

    },

    "changed": true,

    "checksum": "63ff849c6cde8cd1eef04e0472e832d8407eca00",

    "dest": "/root/hello.sh",

    "gid": 0,

    "group": "root",

    "md5sum": "c426adca4193658a2183f59d726cc2dc",

    "mode": "0644",

    "owner": "root",

    "size": 58,

    "src": "/root/.ansible/tmp/ansible-tmp-1584450232.14-44687748938829/source",

    "state": "file",

    "uid": 0

}
node1节点查看:
[root@node1 ~]# ll
total 8
-rw-------. 1 root root 1557 Sep 28 22:49 anaconda-ks.cfg
-rw-r--r-- 1 root root 58 Mar 17 21:03 hello.sh
删除node节点的hello.sh文件,重新创建个同名文件,再使用ansible复制,如目标存在,默认覆盖,此处backup=yes指定先备份(ansible有幂等性特点)
[root@ansible ~]#ansible all -m copy -a ’src=/root/hello.sh dest=/root/ backup=yes mode=+x’ #src:指定源文件 dest:指定目标文件存放目录 backup=yes:如果目标文件存在则进行备份
192.168.100.20 | CHANGED => {
"ansible_facts": {
"discovered_interpreter_python": "/usr/bin/python"
},
"changed": true,
"checksum": "63ff849c6cde8cd1eef04e0472e832d8407eca00",
"dest": "/root/hello.sh",
"gid": 0,
"group": "root",
"mode": "0755",
"owner": "root",
"path": "/root/hello.sh",
"size": 58,
"state": "file",
"uid": 0
}
192.168.100.10 | CHANGED => {
"ansible_facts": {
"discovered_interpreter_python": "/usr/bin/python"
},
"changed": true,
"checksum": "63ff849c6cde8cd1eef04e0472e832d8407eca00",
"dest": "/root/hello.sh",
"gid": 0,
"group": "root",
"mode": "0755",
"owner": "root",
"path": "/root/hello.sh",
"size": 58,
"state": "file",
"uid": 0
}
[root@ansible ~]#ansible all -a ’ls /root/’
192.168.100.20 | CHANGED | rc=0 >>
anaconda-ks.cfg
hello.sh
hello.sh.4160.2020-03-17@21:14:23~ #原文件存在,被备份
jdk-8u221-linux-x64.tar.gz
192.168.100.10 | CHANGED | rc=0 >>
anaconda-ks.cfg
hello.sh
hello.sh.4604.2020-03-17@21:14:22~ #原文件存在,被备份
5>Fetch模块:从客户端取文件至服务器端,copy相反,目录可先tar
[root@ansible ~]#mkdir /data    #先创建一个/data目录,存放抓取过来的文件

[root@ansible ~]#ansible all -m fetch -a ’src=/root/anaconda-ks.cfg dest=/data’

192.168.100.10 | CHANGED => {

    "changed": true,

    "checksum": "c324508ffa651d64f4fa6286fb74ec438e283b3b",

    "dest": "/data/192.168.100.10/root/anaconda-ks.cfg",

    "md5sum": "b1c0bd6a556fac4e120fddcc7d1124df",

    "remote_checksum": "c324508ffa651d64f4fa6286fb74ec438e283b3b",

    "remote_md5sum": null

}

192.168.100.20 | CHANGED => {

    "changed": true,

    "checksum": "4a2e5b1e34c5496d9dcebbb9a1b7ece8b6b03950",

    "dest": "/data/192.168.100.20/root/anaconda-ks.cfg",

    "md5sum": "32435d070271e8018672e21ae7c2acbb",

    "remote_checksum": "4a2e5b1e34c5496d9dcebbb9a1b7ece8b6b03950",

    "remote_md5sum": null

}

[root@ansible ~]#tree /data/

/data/

├── 192.168.100.10

│   └── root

│       └── anaconda-ks.cfg

└── 192.168.100.20

    └── root

        └── anaconda-ks.cfg
4 directories, 2 files
6>File模块:设置文件属性
[root@ansible ~]#ansible all -a ’ls /data’

192.168.100.20 | FAILED | rc=2 >>

ls: 无法访问/data: 没有那个文件或目录non-zero return code

192.168.100.10 | FAILED | rc=2 >>

ls: 无法访问/data: 没有那个文件或目录non-zero return code

[root@ansible ~]#ansible all -m shell -a ’mkdir /data’    #可以看到我们使用shell,创建目录,建议我们使用file模块创建目录

[WARNING]: Consider using the file module with state=directory rather than running

’mkdir’.  If you need to mand because file is insufficient you can add

’warn: false’ to mand task or set ’command_warnings=False’ in ansible.cfg

to get rid of this message.

192.168.100.10 | CHANGED | rc=0 >>
192.168.100.20 | CHANGED | rc=0 >>
[root@ansible ~]#ansible all -a ’ls /data’
192.168.100.20 | CHANGED | rc=0 >>
192.168.100.10 | CHANGED | rc=0 >>
[root@ansible ~]#ansible all -m file -a ’name=/data/f1 state=touch’ #在创建的/data目录下,使用file模块创建文件,state=touch:状态=touch 创建
192.168.100.20 | CHANGED => {
"ansible_facts": {
"discovered_interpreter_python": "/usr/bin/python"
},
"changed": true,
"dest": "/data/f1",
"gid": 0,
"group": "root",
"mode": "0644",
"owner": "root",
"size": 0,
"state": "file",
"uid": 0
}
192.168.100.10 | CHANGED => {
"ansible_facts": {
"discovered_interpreter_python": "/usr/bin/python"
},
"changed": true,
"dest": "/data/f1",
"gid": 0,
"group": "root",
"mode": "0644",
"owner": "root",
"size": 0,
"state": "file",
"uid": 0
}
[root@ansible ~]#ansible all -a ’ls /data’
192.168.100.20 | CHANGED | rc=0 >>
f1
192.168.100.10 | CHANGED | rc=0 >>
f1
[root@ansible ~]#ansible all -m file -a ’name=/data/f1 state=absent’ #absent删除文件
192.168.100.10 | CHANGED => {
"ansible_facts": {
"discovered_interpreter_python": "/usr/bin/python"
},
"changed": true,
"path": "/data/f1",
"state": "absent"
}
192.168.100.20 | CHANGED => {
"ansible_facts": {
"discovered_interpreter_python": "/usr/bin/python"
},
"changed": true,
"path": "/data/f1",
"state": "absent"
}
[root@ansible ~]#ansible all -a ’ls /data’
192.168.100.20 | CHANGED | rc=0 >>
192.168.100.10 | CHANGED | rc=0 >>
[root@ansible ~]#ansible all -m file -a ’name=/data/dir1 state=directory’ #directory创建目录
192.168.100.20 | CHANGED => {
"ansible_facts": {
"discovered_interpreter_python": "/usr/bin/python"
},
"changed": true,
"gid": 0,
"group": "root",
"mode": "0755",
"owner": "root",
"path": "/data/dir1",
"size": 6,
"state": "directory",
"uid": 0
}
192.168.100.10 | CHANGED => {
"ansible_facts": {
"discovered_interpreter_python": "/usr/bin/python"
},
"changed": true,
"gid": 0,
"group": "root",
"mode": "0755",
"owner": "root",
"path": "/data/dir1",
"size": 6,
"state": "directory",
"uid": 0
}
[root@ansible ~]#ansible all -a ’ls -l /data’
192.168.100.20 | CHANGED | rc=0 >>
总用量 0
drwxr-xr-x 2 root root 6 3月 17 22:29 dir1
192.168.100.10 | CHANGED | rc=0 >>
总用量 0
drwxr-xr-x 2 root root 6 3月 17 22:29 dir1
[root@ansible ~]#ansible all -m file -a ’name=/data/dir1 state=absent’ #删除目录
192.168.100.20 | CHANGED => {
"ansible_facts": {
"discovered_interpreter_python": "/usr/bin/python"
},
"changed": true,
"path": "/data/dir1",
"state": "absent"
}
192.168.100.10 | CHANGED => {
"ansible_facts": {
"discovered_interpreter_python": "/usr/bin/python"
},
"changed": true,
"path": "/data/dir1",
"state": "absent"
}
[root@ansible ~]#ansible all -a ’ls /data’
192.168.100.20 | CHANGED | rc=0 >>
192.168.100.10 | CHANGED | rc=0 >>
[root@ansible ~]#ansible all -m file -a ’src=/etc/fstab dest=/data/fstab.link state=link’ #src,dest指定源文件,目标文件,link:创建软链接
192.168.100.20 | CHANGED => {
"ansible_facts": {
"discovered_interpreter_python": "/usr/bin/python"
},
"changed": true,
"dest": "/data/fstab.link",
"gid": 0,
"group": "root",
"mode": "0777",
"owner": "root",
"size": 10,
"src": "/etc/fstab",
"state": "link",
"uid": 0
}
192.168.100.10 | CHANGED => {
"ansible_facts": {
"discovered_interpreter_python": "/usr/bin/python"
},
"changed": true,
"dest": "/data/fstab.link",
"gid": 0,
"group": "root",
"mode": "0777",
"owner": "root",
"size": 10,
"src": "/etc/fstab",
"state": "link",
"uid": 0
}
[root@ansible ~]#ansible all -a ’ls -l /data’
192.168.100.20 | CHANGED | rc=0 >>
总用量 0
lrwxrwxrwx 1 root root 10 3月 17 22:31 fstab.link -> /etc/fstab
192.168.100.10 | CHANGED | rc=0 >>
总用量 0
lrwxrwxrwx 1 root root 10 3月 17 22:31 fstab.link -> /etc/fstab
[root@ansible ~]#ansible all -m file -a ’dest=/data/fstab.link state=absent’ #删除软链接
192.168.100.10 | CHANGED => {
"ansible_facts": {
"discovered_interpreter_python": "/usr/bin/python"
},
"changed": true,
"path": "/data/fstab.link",
"state": "absent"
}
192.168.100.20 | CHANGED => {
"ansible_facts": {
"discovered_interpreter_python": "/usr/bin/python"
},
"changed": true,
"path": "/data/fstab.link",
"state": "absent"
}
[root@ansible ~]#ansible all -a ’ls -l /data’
192.168.100.20 | CHANGED | rc=0 >>
总用量 0
192.168.100.10 | CHANGED | rc=0 >>
总用量 0
7>Hostname模块:管理主机名
node-1节点先查看主机名:

[root@node-1 ~]# hostname

node-1
[root@ansible ~]#ansible 192.168.100.10 -m hostname -a ’name=node1’
192.168.100.10 | CHANGED => {
"ansible_facts": {
"ansible_domain": "",
"ansible_fqdn": "node1",
"ansible_hostname": "node1",
"ansible_nodename": "node1",
"discovered_interpreter_python": "/usr/bin/python"
},
"changed": true,
"name": "node1"
}
node-1节点再查看主机名:exit退出生效
[root@node-1 ~]# hostname
node1
8>Cron模块:计划任务支持时间:minute , hour , day , month , weekday:分钟,小时,日,月,周
[root@ansible ~]#ansible all -m cron -a ’minute=* weekday=1,2,3 job="/usr/bin/wall FBI warning" name=warning’    #创建任务

192.168.100.20 | CHANGED => {

    "ansible_facts": {

        "discovered_interpreter_python": "/usr/bin/python"

    },

    "changed": true,

    "envs": [],

    "jobs": [

        "warning"

    ]

}

192.168.100.10 | CHANGED => {

    "ansible_facts": {

        "discovered_interpreter_python": "/usr/bin/python"

    },

    "changed": true,

    "envs": [],

    "jobs": [

        "warning"

    ]

}
node-1节点查看:node-2节点类似
[root@node-1 ~]#
Broadcast message from root@node-1 (Tue Mar 17 22:48:01 2020):
FBI warning
Broadcast message from root@node-1 (Tue Mar 17 22:49:01 2020):
FBI warning
[root@ansible ~]#ansible all -m cron -a ’disabled=true job="/usr/bin/wall FBI warning" name=warning’ #disabled=true关闭任务
192.168.100.20 | CHANGED => {
"ansible_facts": {
"discovered_interpreter_python": "/usr/bin/python"
},
"changed": true,
"envs": [],
"jobs": [
"warning"
]
}
192.168.100.10 | CHANGED => {
"ansible_facts": {
"discovered_interpreter_python": "/usr/bin/python"
},
"changed": true,
"envs": [],
"jobs": [
"warning"
]
}
[root@ansible ~]#ansible all -m cron -a ’job="/usr/bin/wall FBI warning" name=warning state=absent’ #absent删除任务
192.168.100.20 | CHANGED => {
"ansible_facts": {
"discovered_interpreter_python": "/usr/bin/python"
},
"changed": true,
"envs": [],
"jobs": []
}
192.168.100.10 | CHANGED => {
"ansible_facts": {
"discovered_interpreter_python": "/usr/bin/python"
},
"changed": true,
"envs": [],
"jobs": []
}
9>Yum:管理包 ansible server -m yum -a ’name=httpd state=latest’安装 ansible server -m yum -a ’name=httpd state=absent’删除
[root@ansible ~]#ansible all -m yum -a ’name=httpd state=latest’    #latest:安装

192.168.100.10 | CHANGED => {

    "ansible_facts": {

        "discovered_interpreter_python": "/usr/bin/python"

    },

    "changed": true,

    "changes": {

        "installed": [

            "httpd"

        ],

        "updated": []

    },

    "msg": "",

    "rc": 0,

    "results": [

        "Loaded plugins: fastestmirror

Loading mirror speeds from cached hostfile

Resolving Dependencies

--> Running transaction check

---> Package httpd.x86_64 0:2.4.6-67.el7.centos will be installed

--> Processing Dependency: httpd-tools = 2.4.6-67.el7.centos for package: httpd-2.4.6-67.el7.centos.x86_64

--> Processing Dependency: /etc/mime.types for package: httpd-2.4.6-67.el7.centos.x86_64

--> Processing Dependency: libaprutil-1.so.0()(64bit) for package: httpd-2.4.6-67.el7.centos.x86_64

--> Processing Dependency: libapr-1.so.0()(64bit) for package: httpd-2.4.6-67.el7.centos.x86_64

--> Running transaction check

---> Package apr.x86_64 0:1.4.8-3.el7 will be installed

---> Package apr-util.x86_64 0:1.5.2-6.el7 will be installed

---> Package httpd-tools.x86_64 0:2.4.6-67.el7.centos will be installed

---> Package mailcap.noarch 0:2.1.41-2.el7 will be installed

--> Finished Dependency Resolution
Dependencies Resolved
================================================================================
Package Arch Version Repository Size
================================================================================
Installing:
httpd x86_64 2.4.6-67.el7.centos base 2.7 M
Installing for dependencies:
apr x86_64 1.4.8-3.el7 base 103 k
apr-util x86_64 1.5.2-6.el7 base 92 k
httpd-tools x86_64 2.4.6-67.el7.centos base 87 k
mailcap noarch 2.1.41-2.el7 base 31 k
Transaction Summary
================================================================================
Install 1 Package (+4 Dependent packages)
Total download size: 3.0 M
Installed size: 10 M
Downloading packages:
--------------------------------------------------------------------------------
Total 8.4 MB/s | 3.0 MB 00:00
Running transaction check
Running transaction test
Transaction test succeeded
Running transaction
Installing : apr-1.4.8-3.el7.x86_64 1/5
Installing : apr-util-1.5.2-6.el7.x86_64 2/5
Installing : httpd-tools-2.4.6-67.el7.centos.x86_64 3/5
Installing : mailcap-2.1.41-2.el7.noarch 4/5
Installing : httpd-2.4.6-67.el7.centos.x86_64 5/5
Verifying : httpd-2.4.6-67.el7.centos.x86_64 1/5
Verifying : mailcap-2.1.41-2.el7.noarch 2/5
Verifying : apr-1.4.8-3.el7.x86_64 3/5
Verifying : httpd-tools-2.4.6-67.el7.centos.x86_64 4/5
Verifying : apr-util-1.5.2-6.el7.x86_64 5/5
Installed:
httpd.x86_64 0:2.4.6-67.el7.centos
Dependency Installed:
apr.x86_64 0:1.4.8-3.el7 apr-util.x86_64 0:1.5.2-6.el7
httpd-tools.x86_64 0:2.4.6-67.el7.centos mailcap.noarch 0:2.1.41-2.el7
Complete!
"
]
}
192.168.100.20 | CHANGED => {
"ansible_facts": {
"discovered_interpreter_python": "/usr/bin/python"
},
"changed": true,
"changes": {
"installed": [
"httpd"
],
"updated": []
},
"msg": "",
"rc": 0,
"results": [
"Loaded plugins: fastestmirror
Loading mirror speeds from cached hostfile
Resolving Dependencies
--> Running transaction check
---> Package httpd.x86_64 0:2.4.6-67.el7.centos will be installed
--> Processing Dependency: httpd-tools = 2.4.6-67.el7.centos for package: httpd-2.4.6-67.el7.centos.x86_64
--> Processing Dependency: /etc/mime.types for package: httpd-2.4.6-67.el7.centos.x86_64
--> Processing Dependency: libaprutil-1.so.0()(64bit) for package: httpd-2.4.6-67.el7.centos.x86_64
--> Processing Dependency: libapr-1.so.0()(64bit) for package: httpd-2.4.6-67.el7.centos.x86_64
--> Running transaction check
---> Package apr.x86_64 0:1.4.8-3.el7 will be installed
---> Package apr-util.x86_64 0:1.5.2-6.el7 will be installed
---> Package httpd-tools.x86_64 0:2.4.6-67.el7.centos will be installed
---> Package mailcap.noarch 0:2.1.41-2.el7 will be installed
--> Finished Dependency Resolution
Dependencies Resolved
================================================================================
Package Arch Version Repository Size
================================================================================
Installing:
httpd x86_64 2.4.6-67.el7.centos base 2.7 M
Installing for dependencies:
apr x86_64 1.4.8-3.el7 base 103 k
apr-util x86_64 1.5.2-6.el7 base 92 k
httpd-tools x86_64 2.4.6-67.el7.centos base 87 k
mailcap noarch 2.1.41-2.el7 base 31 k
Transaction Summary
================================================================================
Install 1 Package (+4 Dependent packages)
Total download size: 3.0 M
Installed size: 10 M
Downloading packages:
--------------------------------------------------------------------------------
Total 8.3 MB/s | 3.0 MB 00:00
Running transaction check
Running transaction test
Transaction test succeeded
Running transaction
Installing : apr-1.4.8-3.el7.x86_64 1/5
Installing : apr-util-1.5.2-6.el7.x86_64 2/5
Installing : httpd-tools-2.4.6-67.el7.centos.x86_64 3/5
Installing : mailcap-2.1.41-2.el7.noarch 4/5
Installing : httpd-2.4.6-67.el7.centos.x86_64 5/5
Verifying : httpd-2.4.6-67.el7.centos.x86_64 1/5
Verifying : mailcap-2.1.41-2.el7.noarch 2/5
Verifying : apr-1.4.8-3.el7.x86_64 3/5
Verifying : httpd-tools-2.4.6-67.el7.centos.x86_64 4/5
Verifying : apr-util-1.5.2-6.el7.x86_64 5/5
Installed:
httpd.x86_64 0:2.4.6-67.el7.centos
Dependency Installed:
apr.x86_64 0:1.4.8-3.el7 apr-util.x86_64 0:1.5.2-6.el7
httpd-tools.x86_64 0:2.4.6-67.el7.centos mailcap.noarch 0:2.1.41-2.el7
Complete!
"
]
}
[root@ansible ~]#ansible all -m shell -a ’rpm -q httpd’ #查看是否安装
[WARNING]: Consider using the yum, dnf or zypper module rather than running ’rpm’.
If you need to mand because yum, dnf or zypper is insufficient you can add
’warn: false’ to mand task or set ’command_warnings=False’ in ansible.cfg
to get rid of this message.
192.168.100.20 | CHANGED | rc=0 >>
httpd-2.4.6-67.el7.centos.x86_64
192.168.100.10 | CHANGED | rc=0 >>
httpd-2.4.6-67.el7.centos.x86_64
[root@ansible ~]#ansible all -m yum -a ’name=httpd state=absent’ #absent:卸载
192.168.100.20 | CHANGED => {
"ansible_facts": {
"discovered_interpreter_python": "/usr/bin/python"
},
"changed": true,
"changes": {
"removed": [
"httpd"
]
},
"msg": "",
"rc": 0,
"results": [
"已加载插件:fastestmirror
正在解决依赖关系
--> 正在检查事务
---> 软件包 httpd.x86_64.0.2.4.6-67.el7.centos 将被 删除
--> 解决依赖关系完成
依赖关系解决
================================================================================
Package 架构 版本 源 大小
================================================================================
正在删除:
httpd x86_64 2.4.6-67.el7.centos @base 9.4 M
事务概要
================================================================================
移除 1 软件包
安装大小:9.4 M
Downloading packages:
Running transaction check
Running transaction test
Transaction test succeeded
Running transaction
正在删除 : httpd-2.4.6-67.el7.centos.x86_64 1/1
验证中 : httpd-2.4.6-67.el7.centos.x86_64 1/1
删除:
httpd.x86_64 0:2.4.6-67.el7.centos
完毕!
"
]
}
192.168.100.10 | CHANGED => {
"ansible_facts": {
"discovered_interpreter_python": "/usr/bin/python"
},
"changed": true,
"changes": {
"removed": [
"httpd"
]
},
"msg": "",
"rc": 0,
"results": [
"已加载插件:fastestmirror
正在解决依赖关系
--> 正在检查事务
---> 软件包 httpd.x86_64.0.2.4.6-67.el7.centos 将被 删除
--> 解决依赖关系完成
依赖关系解决
================================================================================
Package 架构 版本 源 大小
================================================================================
正在删除:
httpd x86_64 2.4.6-67.el7.centos @base 9.4 M
事务概要
================================================================================
移除 1 软件包
安装大小:9.4 M
Downloading packages:
Running transaction check
Running transaction test
Transaction test succeeded
Running transaction
正在删除 : httpd-2.4.6-67.el7.centos.x86_64 1/1
验证中 : httpd-2.4.6-67.el7.centos.x86_64 1/1
删除:
httpd.x86_64 0:2.4.6-67.el7.centos
完毕!
"
]
}
[root@ansible ~]#ansible all -m shell -a ’rpm -q httpd’ #卸载后查看
[WARNING]: Consider using the yum, dnf or zypper module rather than running ’rpm’.
If you need to mand because yum, dnf or zypper is insufficient you can add
’warn: false’ to mand task or set ’command_warnings=False’ in ansible.cfg
to get rid of this message.
192.168.100.20 | FAILED | rc=1 >>
未安装软件包 httpd non-zero return code
192.168.100.10 | FAILED | rc=1 >>
未安装软件包 httpd non-zero return code
10>Service模块:管理服务 ansible server -m service -a ’name=httpd state=stopped’ ansible server -m service -a ’name=httpd state=started’ ansible server -m service -a ’name=httpd state=reloaded’ ansible server -m service -a ’name=httpd state=restarted’
[root@ansible ~]#ansible all -m yum -a ’name=httpd state=latest’    #安装httpd

[root@ansible ~]#ansible all -m shell -a ’ss -ntl’

192.168.100.20 | CHANGED | rc=0 >>

State      Recv-Q Send-Q Local Address:Port               Peer Address:Port

LISTEN     0      128          *:22                       *:*

LISTEN     0      100    127.0.0.1:25                       *:*

LISTEN     0      128         :::22                      :::*

LISTEN     0      100        ::1:25                      :::*

192.168.100.10 | CHANGED | rc=0 >>

State      Recv-Q Send-Q Local Address:Port               Peer Address:Port

LISTEN     0      128          *:22                       *:*

LISTEN     0      100    127.0.0.1:25                       *:*

LISTEN     0      128         :::22                      :::*

LISTEN     0      100        ::1:25                      :::*

[root@ansible ~]#ansible all -m service -a ’name=httpd state=started enabled=yes’    #启动httpd,并设为开机自启动

[root@ansible ~]#ansible all -m shell -a ’ss -ntl’

192.168.100.20 | CHANGED | rc=0 >>

State      Recv-Q Send-Q Local Address:Port               Peer Address:Port

LISTEN     0      128          *:22                       *:*

LISTEN     0      100    127.0.0.1:25                       *:*

LISTEN     0      128         :::80                      :::*

LISTEN     0      128         :::22                      :::*

LISTEN     0      100        ::1:25                      :::*

192.168.100.10 | CHANGED | rc=0 >>

State      Recv-Q Send-Q Local Address:Port               Peer Address:Port

LISTEN     0      128          *:22                       *:*

LISTEN     0      100    127.0.0.1:25                       *:*

LISTEN     0      128         :::80                      :::*

LISTEN     0      128         :::22                      :::*

LISTEN     0      100        ::1:25                      :::*[root@ansible ~]#ansible all -m service -a ’name=httpd state=stopped’    #关闭httpd
11>User模块:管理用户
[root@ansible ~]#ansible all -m user -a ’name=nginx shell=/sbin/nologin system=yes home=/var/nginx groups=root,bin uid=ment="nginx service"’    #创建用户指定shell类型,系统账号,家目录,附加组,uid,描述信息

192.168.100.20 | CHANGED => {

    "ansible_facts": {

        "discovered_interpreter_python": "/usr/bin/python"

    },

    "changed": true,

    "comment": "nginx service",

    "create_home": true,

    "group": 77,

    "groups": "root,bin",

    "home": "/var/nginx",

    "name": "nginx",

    "shell": "/sbin/nologin",

    "state": "present",

    "system": true,

    "uid": 77

}

192.168.100.10 | CHANGED => {

    "ansible_facts": {

        "discovered_interpreter_python": "/usr/bin/python"

    },

    "changed": true,

    "comment": "nginx service",

    "create_home": true,

    "group": 77,

    "groups": "root,bin",

    "home": "/var/nginx",

    "name": "nginx",

    "shell": "/sbin/nologin",

    "state": "present",

    "system": true,

    "uid": 77

}

[root@ansible ~]#ansible all -a ’getent passwd nginx’

192.168.100.20 | CHANGED | rc=0 >>

nginx:x:77:77:nginx service:/var/nginx:/sbin/nologin

192.168.100.10 | CHANGED | rc=0 >>

nginx:x:77:77:nginx service:/var/nginx:/sbin/nologin

[root@ansible ~]#ansible all -m user -a ’name=nginx state=absent remove=yes’    #删除用户及其家目录信息

192.168.100.20 | CHANGED => {

    "ansible_facts": {

        "discovered_interpreter_python": "/usr/bin/python"

    },

    "changed": true,

    "force": false,

    "name": "nginx",

    "remove": true,

    "state": "absent",

    "stderr": "userdel: nginx 邮件池 (/var/spool/mail/nginx) 未找到

",

    "stderr_lines": [

        "userdel: nginx 邮件池 (/var/spool/mail/nginx) 未找到"

    ]

}

192.168.100.10 | CHANGED => {

    "ansible_facts": {

        "discovered_interpreter_python": "/usr/bin/python"

    },

    "changed": true,

    "force": false,

    "name": "nginx",

    "remove": true,

    "state": "absent",

    "stderr": "userdel: nginx 邮件池 (/var/spool/mail/nginx) 未找到

",

    "stderr_lines": [

        "userdel: nginx 邮件池 (/var/spool/mail/nginx) 未找到"

    ]

}

[root@ansible ~]#ansible all -a ’getent passwd nginx’

192.168.100.20 | FAILED | rc=2 >>

non-zero return code

192.168.100.10 | FAILED | rc=2 >>

non-zero return code
12>Group:管理组
[root@ansible ~]#ansible all -m group -a ’name=nginx system=yes gid=88’

192.168.100.10 | CHANGED => {

    "ansible_facts": {

        "discovered_interpreter_python": "/usr/bin/python"

    },

    "changed": true,

    "gid": 88,

    "name": "nginx",

    "state": "present",

    "system": true

}

192.168.100.20 | CHANGED => {

    "ansible_facts": {

        "discovered_interpreter_python": "/usr/bin/python"

    },

    "changed": true,

    "gid": 88,

    "name": "nginx",

    "state": "present",

    "system": true

}

[root@ansible ~]#ansible all -a ’getent group nginx’

192.168.100.20 | CHANGED | rc=0 >>

nginx:x:88:

192.168.100.10 | CHANGED | rc=0 >>

nginx:x:88:

[root@ansible ~]#ansible all -m group -a ’name=nginx state=absent’

192.168.100.20 | CHANGED => {

    "ansible_facts": {

        "discovered_interpreter_python": "/usr/bin/python"

    },

    "changed": true,

    "name": "nginx",

    "state": "absent"

}

192.168.100.10 | CHANGED => {

    "ansible_facts": {

        "discovered_interpreter_python": "/usr/bin/python"

    },

    "changed": true,

    "name": "nginx",

    "state": "absent"

}

[root@ansible ~]#ansible all -a ’getent group nginx’

192.168.100.20 | FAILED | rc=2 >>

non-zero return code

192.168.100.10 | FAILED | rc=2 >>

non-zero return code
模块用法不清楚可以查看帮助:
[root@ansible ~]#ansible-doc -s cron #例:查看cron模块
感谢作者:我听过
出处:http://dwz.date/bYGu
以上就是关于gg修改器无毒版免root_gg修改器中文破解版的全部内容,感谢大家的浏览观看,如果你喜欢本站的文章可以CTRL+D收藏哦。

最新版本的gg修改器,最新版本的GG修改器,完美无缺的终极辅助器 大小:13.43MB9,412人安装 随着游戏领域的不断发展,玩家们对于游戏获胜的要求也越来越高。许多游戏之所以受欢……
下载
gg修改器教学视频 游戏修改器,探秘神器- gg修改器教学视频 大小:17.03MB10,012人安装 现在对于游戏爱好者来说,游戏玩烂了真的很没有意思,殊不知游戏本身也是有各种豪华……
下载
手机如何安装gg游戏修改器,让你畅玩游戏 手机如何安装gg游戏修改器 大小:12.25MB9,978人安装 作为一名游戏爱好者,有时候我们可能会遇到游戏瓶颈,总感觉差那么一点才能优秀地完……
下载
gg修改器免root中文修改器_gg修改器最新免root版中文 大小:16.50MB10,842人安装 大家好,今天小编为大家分享关于gg修改器免root中文修改器_gg修改器最新免root版中……
下载
gg最新版修改器,GG最新版修改器:打游戏更激情,体验更优秀 大小:11.21MB9,491人安装 随着现代科技的不断进步,玩游戏已经不再是单纯的娱乐,更是一种个人体验、社交交流……
下载
gg修改器和root版下载,让游戏更畅快无比的神器GG修改器Root版下载 大小:9.89MB9,710人安装 作为一名游戏爱好者,你已经深深热爱上了那些精彩的游戏。但难免会遇到一些卡顿、闪……
下载
gg游戏修改器快速基础教程,gg游戏修改器游戏玩家的神器 大小:6.30MB10,060人安装 gg游戏修改器是一款非常实用的游戏修改工具,可以帮助玩家快速修改游戏内的一些参数……
下载
gg修改器免root链接, gg修改器免root链接:让你轻松修改游戏 大小:18.00MB9,398人安装 许多游戏都需要在手机上进行,但有些功能却被限制了。例如,你可能想要更改某个游……
下载
gg修改器中文免费版_gg修改器中文版下载安装 大小:3.95MB10,962人安装 大家好,今天小编为大家分享关于gg修改器中文免费版_gg修改器中文版下载安装的内容……
下载
gg修改器改皮肤教程最新,GG修改器改皮肤教程让你的英雄焕然一新 大小:3.11MB9,558人安装 英雄联盟是一款备受玩家热爱的MOBA游戏,而英雄的皮肤则是许多玩家在游戏中追求的目……
下载