GG修改器破解版下载地址:https://ghb2023zs.bj.bcebos.com/gg/xgq/ggxgq?GGXGQ
大家好,今天小编为大家分享关于在gg修改器怎么使用root_GG修改器怎么使用?的内容,赶快来一起来看看吧。
只是ZooKeeper有点特别:
key:是以路径的形式表示的,那就以为着,各key之间有父子关系,比如:
ZooKeeper中,对每一个数据key,称作一个znode
综上所述,ZooKeeper中的数据存储形式如下:

znode类型
ZooKeeper中的znode有多种类型:
组合类型:
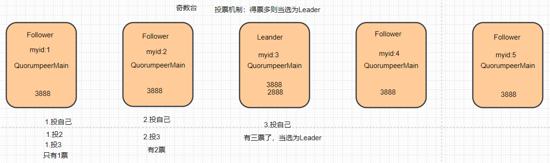
ZooKeeper的集群部署
集群选举示意图:
解压ZooKeeper安装包到apps目录下:
tar -zxvf zookeeper-3.4.6.tar.gz -C apps
cd /root/apps/zookeeper-3.4.6/conf
cp zoo_sample.cfg zoo.cfg
vi zoo.cfg
修改dataDir=/root/zkdata
在后面加上集群的机器:2888是leader和follower通讯端口,3888是投票的
server.1=hdp-01:2888:3888
server.2=hdp-02:2888:3888
server.3=hdp-03:2888:3888
对3台节点,都创建目录 mkdir /root/zkdata
对3台节点,在工作目录中生成myid文件,但内容要分别为各自的id: 1,2,3
echo 1 > /root/zkdata/myid
echo 2 > /root/zkdata/myid
echo 3 > /root/zkdata/myid
从hdp20-01上scp安装目录到其他两个节点
cd apps
scp -r zookeeper-3.4.6/ hdp-02:$PWD
scp -r zookeeper-3.4.6/ hdp-03:$PWD
启动ZooKeeper集群
ZooKeeper没有提供自动批量启动脚本,需要手动一台一台地起ZooKeeper进程
在每一台节点上,运行命令:
cd /root/apps/zookeeper-3.4.6
bin/zkServer.sh start
启动后,用jps应该能看到一个进程:QuorumPeerMain
但是,光有进程不代表zk已经正常服务,需要用命令检查状态:
bin/zkServer.sh status
能看到角色模式:为leader或follower,即正常了。
自己写个脚本,一键启动
vi zkmanage.sh
#!/bin/bash
for host in hdp-01 hdp-02 hdp-03
do
echo “${host}:$1ing…..”
ssh $host “/root/apps/zookeeper-3.4.6/bin/zkServer.sh $1”
done
停止命令:sh zjmanage.sh stop
加个可执行权限:chmod +zkmanage.sh
启动命令:./zkmanage.sh start
但是出现没有Java环境变量问题,修改配置文件
vi zkmanage.sh
修改配置如下:
#!/bin/bash
for host in hdp-01 hdp-02 hdp-03
do
echo “${host}:$1ing…..”
ssh $host “source /etc/profile;/root/apps/zookeeper-3.4.6/bin/zkServer.sh $1”
done
sleep 2
for host in hdp-01 hdp-02 hdp-03
do
ssh $host “source /etc/profile;/root/apps/zookeeper-3.4.6/bin/zkServer.sh status”
done
启动集群结果:
hdp-01:starting…..
JMX enabled by default
Using config: /root/apps/zookeeper-3.4.6/bin/../conf/zoo.cfg
Starting zookeeper … STARTED
hdp-02:starting…..
JMX enabled by default
Using config: /root/apps/zookeeper-3.4.6/bin/../conf/zoo.cfg
Starting zookeeper … STARTED
hdp-03:starting…..
JMX enabled by default
Using config: /root/apps/zookeeper-3.4.6/bin/../conf/zoo.cfg
Starting zookeeper … STARTED
JMX enabled by default
Using config: /root/apps/zookeeper-3.4.6/bin/../conf/zoo.cfg
Mode: follower
JMX enabled by default
Using config: /root/apps/zookeeper-3.4.6/bin/../conf/zoo.cfg
Mode: leader
JMX enabled by default
Using config: /root/apps/zookeeper-3.4.6/bin/../conf/zoo.cfg
Mode: follower
ZooKeeper的Java客户端操作代码:
public class ZookeeperCliDemo {
ZooKeeper zk =null;
@Before
public void init() throws Exception {
zk=new ZooKeeper(“hdp-01:2181,hdp-02:2181,hdp-03:2181”, 2000, null);
}
@Test
public void testCreate() throws Exception {
//参数1:要创建的节点路径;参数2:数据;参数3:访问权限;参数4:节点类型
String create = zk.create(“/eclipse”, “hello eclipse”.getBytes(), ZooDefs.Ids.OPEN_ACL_UNSAFE, CreateMode.PERSISTENT);
System.out.println(create);
zk.close();
}
@Test
public void testUpdate() throws Exception {
//参数1:节点路径;参数2:数据;参数3:所要修改的版本,-1表示任意版本
zk.setData(“/eclipse”,”我喜欢青青”.getBytes(),-1);
zk.close();
}
@Test
public void testGet() throws Exception {
//参数1:节点路径;参数2:事件监听;参数3:所要修改的版本,null表示最新版本
byte[] data = zk.getData(“/eclipse”, false, null);
System.out.println(new String(data,”UTF-8″));
zk.close();
}
@Test
public void testListChildren() throws KeeperException, InterruptedException {
//参数1:节点路径;参数2:是否要监听
//注意:返回的结果只有子节点的名字,不带全路径
List<String> children = zk.getChildren(“/cc”, false);
for(String child:children){
System.out.println(child);
}
zk.close();
}
@Test
public void testRm() throws KeeperException, InterruptedException {
zk.delete(“/eclipse”,-1);
zk.close();
}
}
ZooKeeper监听功能代码:
public class ZookeeperWatchDemo {
ZooKeeper zk =null;
@Before
public void init() throws Exception {
zk=new ZooKeeper(“hdp-01:2181,hdp-02:2181,hdp-03:2181”, 2000, new Watcher() {
public void process(WatchedEvent watchedEvent) {
if (watchedEvent.getState() == Event.KeeperState.SyncConnected
&& watchedEvent.getType() == Event.EventType.NodeDataChanged) {
System.out.println(“收到事件所发生节点的路径” + watchedEvent.getPath());
System.out.println(“收到事件所发生节点的状态” + watchedEvent.getState());
System.out.println(“收到事件所发生节点的类型” + watchedEvent.getType());
System.out.println(“watch事件通知。。换照片”);
try {
zk.getData(“/mygirls”, true, null);
} catch (Exception e) {
e.printStackTrace();
}
}else if(watchedEvent.getState()==Event.KeeperState.SyncConnected &&
watchedEvent.getType()==Event.EventType.NodeChildrenChanged){
System.out.println(“收到事件所发生节点的路径” + watchedEvent.getPath());
System.out.println(“收到事件所发生节点的状态” + watchedEvent.getState());
System.out.println(“收到事件所发生节点的类型” + watchedEvent.getType());
}
}
});
}
@Test
public void testGetWatch() throws Exception {
byte[] data = zk.getData(“/mygirls”,true, null);
List<String> children = zk.getChildren(“/mygirls”, true);
System.out.println(new String(data,”UTF-8″));
Thread.sleep(Long.MAX_VALUE);
}
}
ZooKeeper开发分布式系统案例代码,动态上下线感知。
服务代码:
public class TimeQueryServer {
ZooKeeper zk=null;
public void connectZk()throws Exception{
zk=new ZooKeeper(“hdp-01:2181,hdp-02:2181,hdp-03:2181”, 2000, null);
}
public void registerServerInfo(String hostname,String port)throws Exception{
/**
* 先判断注册节点的父节点是否存在,如果不存在,则创建持久节点
*/
Stat exists = zk.exists(“/servers”, false);
if(exists==null){
zk.create(“/servers”,null,ZooDefs.Ids.OPEN_ACL_UNSAFE,CreateMode.PERSISTENT);
}
/**
* 注册服务器数据到zk的约定注册节点下
*/
String create = zk.create(“/servers/server”, (hostname + “:” + port).getBytes(),
ZooDefs.Ids.OPEN_ACL_UNSAFE, CreateMode.EPHEMERAL_SEQUENTIAL);
System.out.println(hostname+” 服务器向zk 注册成功,注册节点为:/servers”+create);
}
public static void main(String[] args) throws Exception {
//1.构造zk连接
TimeQueryServer timeQueryServer = new TimeQueryServer();
timeQueryServer.connectZk();
//2.注册服务器信息
timeQueryServer.registerServerInfo(“192.168.150.3″,”44772”);
//3.启动业务线程开始处理业务
new TimeQueryService(44772).start();
}
}
public class TimeQueryService extends Thread {
int port=0;
public TimeQueryService(int port){
this.port=port;
}
@Override
public void run() {
try {
ServerSocket ss = new ServerSocket(port);
System.out.println(“业务线程已经绑定端口”+port+”开始接受客户端请求..”);
while (true){
Socket sc = ss.accept();
InputStream inputStream = sc.getInputStream();
OutputStream outputStream = sc.getOutputStream();
outputStream.write(new Date().toString().getBytes());
}
} catch (Exception e) {
e.printStackTrace();
}
}
}
消费者代码:
public class Consumer {
//定义一个list用于存放在线的服务器列表
private volatile ArrayList<String>onlineServers=new ArrayList<String>();
ZooKeeper zk=null;
public void connectZk()throws Exception{
zk=new ZooKeeper(“hdp-01:2181,hdp-02:2181,hdp-03:2181”, 2000, new Watcher() {
public void process(WatchedEvent watchedEvent) {
if (watchedEvent.getState()==Event.KeeperState.SyncConnected && watchedEvent.getType()==Event.EventType.NodeChildrenChanged){
try{
//事件回调逻辑中,再次查询zk上在线服务器节点即可,查询逻辑中又再次注册子节点变化事件监听
getOnlineServers();
}catch (Exception e){
e.printStackTrace();
}
}
}
});
}
//查询在线服务器列表
public void getOnlineServers()throws Exception{
List<String> children = zk.getChildren(“/servers”, true);
ArrayList<String> servers = new ArrayList<String>();
for (String child:children){
byte[] data = zk.getData(“/servers/” + child, false, null);
String serverInfo=new String(data);
servers.add(serverInfo);
}
onlineServers=servers;
System.out.println(“查询了一次zk,当前在线的服务器有:”+servers);
}
public void setRequest() throws Exception {
Random random = new Random();
while (true){
try {
int nextInt=random.nextInt(onlineServers.size());
String server=onlineServers.get(nextInt);
String hostname=server.split(“:”)[0];
int port=Integer.parseInt(server.split(“:”)[1]);
System.out.println(“本次请求挑选的服务器为:”+server);
Socket socket = new Socket(hostname, port);
OutputStream out = socket.getOutputStream();
InputStream in = socket.getInputStream();
out.write(“hahaha”.getBytes());
out.flush();
byte[] buf = new byte[256];
int read=in.read(buf);
String s = new String(buf, 0, read);
System.out.println(“服务器响应时间为:”+s);
out.close();
in.close();
socket.close();
Thread.sleep(2000);
}catch (Exception e){
}
}
}
public static void main(String[] args) throws Exception {
//构造zk连接对象
Consumer consumer = new Consumer();
consumer.connectZk();
//查询在线服务器列表
consumer.getOnlineServers();
//处理业务
consumer.setRequest();
}
}
pom
<dependencies>
<dependency>
<groupId>junit</groupId>
<artifactId>junit</artifactId>
<version>RELEASE</version>
</dependency>
<dependency>
<groupId>org.apache.logging.log4j</groupId>
<artifactId>log4j-core</artifactId>
<version>2.8.2</version>
</dependency>
<!– https:///artifact/org.apache.zookeeper/zookeeper –>
<dependency>
<groupId>org.apache.zookeeper</groupId>
<artifactId>zookeeper</artifactId>
<version>3.4.10</version>
</dependency>
</dependencies>
启动多个服务。
控制台输出:
192.168.150.3 服务器向zk 注册成功,注册节点为:/servers/servers/server0000000018
业务线程已经绑定端口44772开始接受客户端请求..
192.168.150.3 服务器向zk 注册成功,注册节点为:/servers/servers/server0000000019
业务线程已经绑定端口44773开始接受客户端请求..
192.168.150.3 服务器向zk 注册成功,注册节点为:/servers/servers/server0000000020
业务线程已经绑定端口44774开始接受客户端请求..
消费者启动
控制台输出:
查询了一次zk,当前在线的服务器有:[192.168.150.3:44773, 192.168.150.3:44772, 192.168.150.3:44774]
本次请求挑选的服务器为:192.168.150.3:44772
服务器响应时间为:Mon Jun 03 20:03:21 CST 2019
本次请求挑选的服务器为:192.168.150.3:44773
服务器响应时间为:Mon Jun 03 20:03:23 CST 2019
本次请求挑选的服务器为:192.168.150.3:44773
服务器响应时间为:Mon Jun 03 20:03:25 CST 2019
本次请求挑选的服务器为:192.168.150.3:44772
服务器响应时间为:Mon Jun 03 20:03:27 CST 2019
下线一个服务后,控制台输出:
查询了一次zk,当前在线的服务器有:[192.168.150.3:44773, 192.168.150.3:44772]
本次请求挑选的服务器为:192.168.150.3:44773
服务器响应时间为:Mon Jun 03 20:04:19 CST 2019
本次请求挑选的服务器为:192.168.150.3:44773
服务器响应时间为:Mon Jun 03 20:04:21 CST 2019
本次请求挑选的服务器为:192.168.150.3:44773
服务器响应时间为:Mon Jun 03 20:04:23 CST 2019
本次请求挑选的服务器为:192.168.150.3:44773
感谢你耐心看完了文章…
关注作者,我会不定期在微头条分享Java,Spring,MyBatis,Netty源码分析,高并发、高性能、分布式、微服务架构的原理,JVM性能优化、分布式架构,BATJ面试 等资料…
以上就是关于在gg修改器怎么使用root_GG修改器怎么使用?的全部内容,感谢大家的浏览观看,如果你喜欢本站的文章可以CTRL+D收藏哦。

gg修改器中文版下载官方_GG修改器中文下载 大小:5.68MB10,749人安装 大家好,今天小编为大家分享关于gg修改器中文版下载官方_GG修改器中文下载的内容,……
下载
GG修改器免root中文版下载,GG修改器免root版中文下载 大小:5.91MB10,803人安装 我托太阳给你送去第一缕阳光的温暖和祝福,愿整个春天你都有一个好心情! 大家好,今……
下载
gg修改器中文版视频,GG修改器中文版视频,让游戏如此简单 大小:9.90MB9,593人安装 作为游戏玩家,大家肯定会遇到许多问题,例如游戏中不平衡的局面,不公正的游戏规则……
下载
泰拉瑞亚gg修改器中文脚本_泰拉瑞亚GG修改器脚本 大小:7.39MB10,884人安装 大家好,今天小编为大家分享关于泰拉瑞亚gg修改器中文脚本_泰拉瑞亚GG修改器脚本的……
下载
gg修改器免root框架用,GG修改器免root框架用改变游戏体验的神器 大小:19.55MB9,560人安装 现在的游戏市场竞争异常激烈,玩家要想在游戏中获得更多的优势,成为高手,自然需要……
下载
gg游戏修改器选择应用进程,GG游戏修改器让游戏体验更卓越 大小:19.58MB9,625人安装 游戏是现代人娱乐生活中不可或缺的一部分,而游戏修改器的问世则让游戏更加精彩。GG……
下载
gg修改器99.0中文版_gg修改器99.0官方版本 大小:10.90MB10,726人安装 大家好,今天小编为大家分享关于gg修改器99.0中文版_gg修改器99.0官方版本的内容,……
下载
gg修改器美化最新版,gg修改器美化最新版:带来不一样的游戏体验 大小:8.50MB9,585人安装 现在的游戏市场越来越火,但是很多玩家们对于游戏画面的要求也越来越高。例如一些游……
下载
gg游戏修改器热键,GG游戏修改器热键:让游戏变得更加有趣! 大小:8.35MB9,682人安装 很多玩家在游玩某些游戏的时候,总感觉游戏中的一些细节和功能并不尽如人意。这个时……
下载
gg修改器如何弄root_GG修改器如何使用 大小:7.55MB10,696人安装 大家好,今天小编为大家分享关于gg修改器如何弄root_GG修改器如何使用的内容,赶快……
下载