GG修改器破解版下载地址:https://ghb2023zs.bj.bcebos.com/gg/xgq/ggxgq?GGXGQ
大家好,今天小编为大家分享关于gg修改器root环境_gg修改器root怎么用的内容,赶快来一起来看看吧。
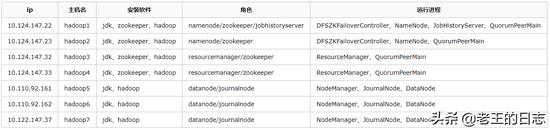
system os: centos 6.5
hadoop: 2.7.3
zoopkeeper: 3.4.12
jdk: 1.8.0
[root@10-124-147-23 local]# cat /etc/hosts

127.0.0.1   localhost localhost.localdomain localhost4 localhost4.localdomain4

10.124.147.22 hadoop1 10-124-147-22

10.124.147.23 hadoop2 10-124-147-23

10.124.147.32 hadoop3 10-124-147-32

10.124.147.33 hadoop4 10-124-147-33

10.110.92.161 hadoop5 10-110-92-161

10.110.92.162 hadoop6 10-110-92-162

10.122.147.37 hadoop7 10-122-147-37
在此需要注意两点
[root@10-124-147-23 letv]# tar xvf jdk-8u141-linux-x64.tar.gz

[root@10-124-147-23 letv]# ln -svfn /letv/jdk1.8.0_141 /usr/local/java
[root@10-124-147-23 letv]# tail -3 /etc/profile

export JAVA_HOME=/usr/local/java

export HADOOP_HOME=/usr/local/hadoop

export PATH=$HADOOP_HOME/bin:$JAVA_HOME/bin:$PATH
[root@10-124-147-23 letv]# source /etc/profile
[root@10-124-147-23 letv]# tar xvf zookeeper-3.4.12.tar.gz

[root@10-124-147-23 letv]# ln -svnf /letv/zookeeper-3.4.12 /usr/local/zookeeper

[root@10-124-147-23 letv]# cd /usr/local/zookeeper/conf

[root@10-124-147-23 conf]# ll

total 16

-rw-rw-r-- 1 1000 1000  535 Mar 27 12:32 configuration.xsl

-rw-rw-r-- 1 1000 1000 2161 Mar 27 12:32 log4j.properties

-rw-rw-r-- 1 1000 1000  922 Mar 27 12:32 zoo_sample.cfg

[root@10-124-147-23 conf]# cp zoo_sample.cfg zoo.cfg
[root@10-124-147-23 conf]# grep  ^[^#] zoo.cfg

tickTime=2000

initLimit=10

syncLimit=5

dataDir=/usr/local/zookeeper/data

clientPort=2181

server.1=hadoop1:2888:3888

server.2=hadoop2:2888:3888

server.3=hadoop3:2888:3888

server.4=hadoop4:2888:3888
修改dataDir值,因为同时要建立zookeeper集群,下面写下对应的server地址
[root@10-124-147-23 conf]# echo 1 > /usr/local/zookeeper/data/myid
将当前主机在zookeeper集群中的id值写入,然后启动zookeeper
[root@10-124-147-23 bin]# pwd

/usr/local/zookeeper/bin

[root@10-124-147-23 bin]# ./zkServer.sh start
同理,启动其它主机的zookeeper,操作同上,唯一区别的就是/usr/local/zookeeper/data/myid中的值,需要彼此不一样
[root@10-124-147-23 bin]# ./zkServer.sh status

ZooKeeper JMX enabled by default

Using config: /usr/local/zookeeper/bin/../conf/zoo.cfg

Mode: follower
[root@10-124-147-33 ~]# /usr/local/zookeeper/bin/zkServer.sh status
ZooKeeper JMX enabled by default
Using config: /usr/local/zookeeper/bin/../conf/zoo.cfg
Mode: leader
hadoop2.0官方提供了两种HDFS HA的解决方案,一种是NFS,另一种是QJM。这里我们使用简单的QJM。在该方案中,主备NameNode之间通过一组JournalNode同步元数据信息,一条数据只要成功写入多数JournalNode即认为写入成功。JournalNode的个数需要为奇数个
[root@10-124-147-33 letv]# tar xvf hadoop-2.7.6.tar.gz

[root@10-124-147-23 ~]# ln -svnf /letv/hadoop-2.7.6 /usr/local/hadoop
本次安装hadoop,只需要指定java环境和hadoop环境即可,因为zookeeper和hadoop都需要运行java环境,上述安装环境已经指定
[root@10-124-147-23 letv]# tail -3 /etc/profile

export JAVA_HOME=/usr/local/java

export HADOOP_HOME=/usr/local/hadoop

export PATH=$HADOOP_HOME/bin:$JAVA_HOME/bin:$PATH
hadoop配置文件位于etc/hadoop目录之下,主要控制文件有以下6个
[root@10-124-147-23 ~]# grep JAVA_HOME /usr/local/hadoop/etc/hadoop/hadoop-env.sh

# The only required environment variable is JAVA_HOME.  All others are

# set JAVA_HOME in this file, so that it is correctly defined on

export JAVA_HOME=/usr/local/java
此处需要指向java环境的实际路径,不能直接使用${JAVA_HOME}来指定,此处并不能直接识别此变量,具体原因未知。
[root@10-124-147-23 ~]# cat /usr/local/hadoop/etc/hadoop/hdfs-site.xml

<?xml version="1.0" encoding="UTF-8"?>

<?xml-stylesheet type="text/xsl" href="configuration.xsl"?>

<!--

  Licensed under the Apache License, Version 2.0 (the "License");

  you may not use this file except pliance with the License.

  You may obtain a copy of the License at

    http://www.apache.org/licenses/LICENSE-2.0

  Unless required by applicable law or agreed to in writing, software

  distributed under the License is distributed on an "AS IS" BASIS,

  WITHOUT WARRANTIES OR CONDITIONS OF ANY KIND, either express or implied.

  See the License for the specific language governing permissions and

  limitations under the License. See panying LICENSE file.

-->

<!-- Put site-specific property overrides in this file. -->

<configuration>

<!--指定hdfs的nameservice为ns1,需要和core-site.xml中的保持一致 -->

<property>

<name>dfs.nameservices</name>

<value>ns1</value>

</property>
<!-- ns1下面有两个NameNode,分别是nn1,nn2 -->
<property>
<name>dfs.ha.namenodes.ns1</name>
<value>nn1,nn2</value>
</property>
<!-- nn1的RPC通信地址 -->
<property>
<name>dfs.namenode.rpc-address.ns1.nn1</name>
<value>hadoop1:9000</value>
</property>
<!-- nn1的http通信地址 -->
<property>
<name>dfs.namenode.http-address.ns1.nn1</name>
<value>hadoop1:50070</value>
</property>
<!-- nn2的RPC通信地址 -->
<property>
<name>dfs.namenode.rpc-address.ns1.nn2</name>
<value>hadoop2:9000</value>
</property>
<!-- nn2的http通信地址 -->
<property>
<name>dfs.namenode.http-address.ns1.nn2</name>
<value>hadoop2:50070</value>
</property>
<!-- 指定NameNode的元数据在JournalNode上的存放位置 -->
<property>
<name>dfs.namenode.shared.edits.dir</name>
<value>qjournal://hadoop5:8485;hadoop6:8485;hadoop7:8485/ns1</value>
</property>
<!-- 指定JournalNode在本地磁盘存放数据的位置 -->
<property>
<name>dfs.journalnode.edits.dir</name>
<value>/usr/local/hadoop/data/journaldata</value>
</property>
<!-- 开启NameNode失败自动切换 -->
<property>
<name>dfs.ha.automatic-failover.enabled</name>
<value>true</value>
</property>
<!-- 配置失败自动切换实现方式 -->
<property>
<name>dfs.client.failover.proxy.provider.ns1</name>
<value>org.apache.hadoop.hdfs.server.namenode.ha.ConfiguredFailoverProxyProvider</value>
</property>
<!-- 配置隔离机制方法,多个机制用换行分割,即每个机制占用一行-->
<property>
<name>dfs.ha.fencing.methods</name>
<value>
sshfence
shell(/bin/true)
</value>
</property>
<!-- 使用sshfence隔离机制时需要ssh免登陆 -->
<property>
<name>dfs.ha.fencing.ssh.private-key-files</name>
<value>/home/hadoop/.ssh/id_rsa</value>
</property>
<!-- 配置sshfence隔离机制超时时间 -->
<property>
<name>dfs.ha.fencing.ssh.connect-timeout</name>
<value>30000</value>
</property>
</configuration>
在hadoop 3中,hdfs的web通讯端口50070 已经变更为9870
[root@10-124-147-23 ~]# cat /usr/local/hadoop/etc/hadoop/mapred-site.xml

<?xml version="1.0"?>

<?xml-stylesheet type="text/xsl" href="configuration.xsl"?>

<!--

  Licensed under the Apache License, Version 2.0 (the "License");

  you may not use this file except pliance with the License.

  You may obtain a copy of the License at

    http://www.apache.org/licenses/LICENSE-2.0

  Unless required by applicable law or agreed to in writing, software

  distributed under the License is distributed on an "AS IS" BASIS,

  WITHOUT WARRANTIES OR CONDITIONS OF ANY KIND, either express or implied.

  See the License for the specific language governing permissions and

  limitations under the License. See panying LICENSE file.

-->

<!-- Put site-specific property overrides in this file. -->
<configuration>
<!-- 指定mr框架为yarn方式 -->
<property>
<name>mapreduce.framework.name</name>
<value>yarn</value>
</property>
<property>
<name>mapreduce.jobhistory.address</name>
<value>hadoop1:10020</value>
</property>
<property>
<name>mapreduce.jobhistory.webapp.address</name>
<value>hadoop1:19888</value>
</property>
</configuration>
[root@10-124-147-23 ~]# cat /usr/local/hadoop/etc/hadoop/core-site.xml

<?xml version="1.0" encoding="UTF-8"?>

<?xml-stylesheet type="text/xsl" href="configuration.xsl"?>

<!--

  Licensed under the Apache License, Version 2.0 (the "License");

  you may not use this file except pliance with the License.

  You may obtain a copy of the License at
http://www.apache.org/licenses/LICENSE-2.0
Unless required by applicable law or agreed to in writing, software
distributed under the License is distributed on an "AS IS" BASIS,
WITHOUT WARRANTIES OR CONDITIONS OF ANY KIND, either express or implied.
See the License for the specific language governing permissions and
limitations under the License. See panying LICENSE file.
-->
<!-- Put site-specific property overrides in this file. -->
<configuration>
<!-- 指定hdfs的nameservice为ns1 -->
<property>
<name>fs.defaultFS</name>
<value>hdfs://ns1</value>
</property>
<!-- 指定hadoop临时目录 -->
<property>
<name>hadoop.tmp.dir</name>
<value>/usr/local/hadoop/data/tmp</value>
</property>
<!-- 指定zookeeper地址 -->
<property>
<name>ha.zookeeper.quorum</name>
<value>hadoop1:2181,hadoop2:2181,hadoop3:2181,hadoop4:2181</value>
</property>
</configuration>
[root@10-124-147-23 ~]# cat /usr/local/hadoop/etc/hadoop/yarn-site.xml

<?xml version="1.0"?>

<!--

  Licensed under the Apache License, Version 2.0 (the "License");

  you may not use this file except pliance with the License.

  You may obtain a copy of the License at

    http://www.apache.org/licenses/LICENSE-2.0

  Unless required by applicable law or agreed to in writing, software

  distributed under the License is distributed on an "AS IS" BASIS,

  WITHOUT WARRANTIES OR CONDITIONS OF ANY KIND, either express or implied.

  See the License for the specific language governing permissions and

  limitations under the License. See panying LICENSE file.

-->
<configuration>
<!-- Site specific YARN configuration properties -->
<!-- 开启RM高可靠 -->
<property>
<name>yarn.resourcemanager.ha.enabled</name>
<value>true</value>
</property>
<!-- 指定RM的cluster id -->
<property>
<name>yarn.resourcemanager.cluster-id</name>
<value>yrc</value>
</property>
<!-- 指定RM的名字 -->
<property>
<name>yarn.resourcemanager.ha.rm-ids</name>
<value>rm1,rm2</value>
</property>
<!-- 分别指定RM的地址 -->
<property>
<name>yarn.resourcemanager.hostname.rm1</name>
<value>hadoop3</value>
</property>
<property>
<name>yarn.resourcemanager.hostname.rm2</name>
<value>hadoop4</value>
</property>
<!-- 指定zk集群地址 -->
<property>
<name>yarn.resourcemanager.zk-address</name>
<value>hadoop1:2181,hadoop2:2181,hadoop3:2181,hadoop4:2181</value>
</property>
<!-- 在RM节点接管后,任务状态可以恢复-->
<property>
<name>yarn.resourcemanager.recovery.enabled</name>
<value>true</value>
</property>
<!-- 设置存储yarn中状态信息的地方,默认为hdfs,这里设置为zookeeper-->
<property>
<name>yarn.resourcemanager.store.class</name>
<value>org.apache.hadoop.yarn.server.resourcemanager.recovery.ZKRMStateStore</value>
</property>
<!-- 使在yarn上能够运行mapreduce_shuffle程序-->
<property>
<name>yarn.nodemanager.aux-services</name>
<value>mapreduce_shuffle</value>
</property>
</configuration>
[root@10-124-147-23 ~]# cat /usr/local/hadoop/etc/hadoop/slaves

hadoop5

hadoop6

hadoop7
这里的slaves分两种,对于hadoop1而言,其为namenode,所以其slaves是hdfs系统中的slaves,也就是datanode,在本文中,设定hadoop5,hadoop6,hadoop7为datanode
而对于hadoop3而言,其为resourcemanager,故其slaves是yarn系统中的slaves,也就是nodemanager,nodemanager是对每机机器的资源状态进行监控,同时将监控结果向resourcemanager进行报告,一般一台datanode上面都会有着nodemanager进程。
本文中journalnode,nodemanager,datanode三个角色都是位于同一机器,实际上journalnode只是参与到namenodeHA模式中,与后两者并不挂钩,因为集群中不允许同时有两个namenode同时工作 ,否则数据地址空间就会出错,但是为了HA,所以standby的namenode需要保持与active状态的namenode数据一致,两个namenode为了数据同步,会通过一组称作journalnodes的独立进程进行相互通信。当active状态的namenode的命名空间有任何修改时,会告知大部分的journalnodes进程。standby状态的namenode有能力读取journalnodes中的变更信息,并且一直监控edit log的变化,把变化应用于自己的命名空间。standby可以确保在集群出错时,命名空间状态已经完全同步了。
一般正常生产中,journalnode设定为5个,基本上zookeeper个数也是设定为5个,文中我zookeeper设定4个其实不太合理。
综上,所以对于hadoop3而言,其slaves也可以设定为hadoop5,hadoop6,hadoop7
所以本文中所有节点,hadoop配置可以保持一致
实际生产中其实只需要namenode之间ssh-key免密即可,实验环境中,因为需要在namenode中直接通过脚本启动其它slaves节点,所以需要进行ssh-key免密的设定
主要的设定的是datanode中需要有两个namenode和两个resourcemanager的ssh-key信息,同时namenode和resourcemanger自身也需要自身的ssh-key,以便启动,所以文中hadoop1,hadoop2,hadoop3,hadoop44台主机的hadoop用户的ssh-key需要放置于每一台主机hadoop用户之下。
[root@10-124-147-23 ~]# useradd hadoop

[hadoop@10-124-147-23 ~]$ ssh-keygen

[hadoop@10-124-147-23 ~]$ cat .ssh/id_rsa.pub

ssh-rsa AAAAB3NzaC1yc2EAAAABIwAAAQEAyQ9T7zTAlhqFM9XQoHTPzwfgDwAzwLUgqe7NnDpufiirK9QqCdLZFNE6PNtN7oNyWMu3r9UE5aMYv9uLMu22m+8xyTXXINYfPW9hsityu/N6a9DwhEC9joNS3DVjBR8YRMQG2sxtDbebbaG2R4BK77DZyoB0uyqRItxLIMYTiZ/00LCMJCoAINUQVzOrteVpLHAviRNnrwZewoD2sUgeZU0A0hT++RiE/prqI+jIFJSacduVaKsabRu/zKan9b8coC1b+GJnypqk+CPyahJL+0jgb9Jgrjm2Lt4erbBo/k3u16nSJpSoSdf7kr5HKv3ds5+fwcMQV5oKV1jv6ximIw== hadoop@10-124-147-23
然后切换至其它节点主要,依次创建hadoop用户,将namenode节点ssh-key写入
[root@10-124-147-33 letv]# useradd hadoop

[hadoop@10-124-147-33 ~]$ mkdir .ssh

[hadoop@10-124-147-33 ~]$ chmod g-w .ssh

以上这一步非常重要,因为正常情况下需要对hadoop用户进行密码设定之后,然后再使用ssh-copy-id将key自动写入到其它主机中,我们并没有对hadoop用户设定密码,而ssh中为了安全,g与o用户是对.ssh目录均无w权限的,所以需要将.ssh目录中g与o用户的w权限去掉。类似的还在后面中的authorized_keys文件

[hadoop@10-124-147-33 ~]$ vim .ssh/authorized_keys

将hadoop1中的id_rsa.pub写入

[hadoop@10-124-147-33 ~]$ chmod 600 .ssh/authorized_keys

[hadoop@10-124-147-33 ~]$ ll .ssh/authorized_keys

-rw------- 1 hadoop hadoop 1608 Jul 19 11:43 .ssh/authorized_keys

[hadoop@10-124-147-33 ~]$ ll -d .ssh/

drwxr-xr-x 2 hadoop hadoop 4096 Jul 19 11:43 .ssh/
将hadoop1中的hadoop目录整个scp至其它节点,同时注意/etc/profile文件,以及部分节点上面的java环境
[hadoop@10-110-92-161 ~]$ cd /usr/local/hadoop/

[hadoop@10-110-92-161 hadoop]$ sbin/hadoop-daemon.sh start journalnode

[hadoop@10-110-92-161 hadoop]$ jps

1557 JournalNode

22439 Jps
三个节点的journalnode都要启动
[hadoop@10-124-147-22 hadoop]$ hdfs namenode -format
[hadoop@10-124-147-22 hadoop]$ sbin/hadoop-daemon.sh start namenode

[hadoop@10-124-147-22 hadoop]$ jps

2580 DFSZKFailoverController

29590 Jps

1487 NameNode
格式化active namenode后会在根据core-site.xml中的hadoop.tmp.dir配置生成个文件,可能直接copy至standby namenode,也可以通过选项-bootstrapStandby直接从active namenode拉取,使用命令拉取的前提是active namenode进程需要启动
[hadoop@10-124-147-23 hadoop]$ hdfs namenode -bootstrapStandby

[hadoop@10-124-147-23 hadoop]$ sbin/hadoop-daemon.sh start namenode

[hadoop@10-124-147-23 hadoop]$ jps

899 NameNode

11846 Jps

1353 DFSZKFailoverController
[hadoop@10-124-147-22 hadoop]$ hdfs zkfc -formatZK
[hadoop@10-124-147-22 hadoop]$ sbin/start-dfs.sh
[hadoop@10-124-147-32 hadoop]$ pwd

/usr/local/hadoop

[hadoop@10-124-147-32 hadoop]$ resourcemanager sbin/start-yarn.sh

[hadoop@10-124-147-32 hadoop]$ jps

30882 ResourceManager

26868 Jps
[hadoop@10-124-147-33 hadoop]$ pwd

/usr/local/hadoop

[hadoop@10-124-147-33 hadoop]$ sbin/yarn-daemon.sh start resourcemanager

[hadoop@10-124-147-33 hadoop]$ jps

22675 Jps

26980 ResourceManager
[hadoop@10-124-147-22 hadoop]$ hdfs haadmin -getServiceState nn1

active

[hadoop@10-124-147-22 hadoop]$ hdfs haadmin -getServiceState nn2

standby

[hadoop@10-124-147-22 hadoop]$ yarn rmadmin -getServiceState rm1

active

[hadoop@10-124-147-22 hadoop]$ yarn rmadmin -getServiceState rm2

standby
此时,可以通过web访问active namenode的50070端口和active resourcemanager的8080端口
在active namenode启动即可
[hadoop@10-124-147-22 hadoop]$ sbin/mr-jobhistory-daemon.sh start historyserver

[hadoop@10-124-147-22 hadoop]$ pwd

/usr/local/hadoop

[hadoop@10-124-147-22 hadoop]$ jps

2580 DFSZKFailoverController

31781 Jps

2711 JobHistoryServer

1487 NameNode
新建一个文件/tmp/test.txt

[hadoop@10-124-147-22 hadoop]$ cat /tmp/test.txt

hello world

hello mysql

hello mongo

hello elasticsearch

hello hadoop

hello hdfs

hello yarn

hello namenode

hello datanode

hello resourcemanager

hello nodemanager

hello journalnode

[hadoop@10-124-147-22 hadoop]$ hadoop fs -put /tmp/test.txt /wordcount

将/tmp/test.txt文件上传于hdfs中,并重命名为wordcount

[hadoop@10-124-147-22 hadoop]$ hadoop fs -cat /wordcount

hello world

hello mysql

hello mongo

hello elasticsearch

hello hadoop

hello hdfs

hello yarn

hello namenode

hello datanode

hello resourcemanager

hello nodemanager

hello journalnode
hadoop中提供了简单的任务测试jar包,可以进行测试
[hadoop@10-124-147-22 hadoop]$ hadoop jar share/hadoop/mapreduce/hadoop-mapreduce-examples-2.7.6.jar pi 2 10

Number of Maps  = 2

Samples per Map = 10

Wrote input for Map #0

Wrote input for Map #1

Starting Job

18/07/23 15:41:47 INFO input.FileInputFormat: Total input paths to process : 2

18/07/23 15:41:47 INFO mapreduce.JobSubmitter: number of splits:2

18/07/23 15:41:47 INFO mapreduce.JobSubmitter: Submitting tokens for job: job_1532056892547_0003

18/07/23 15:41:47 INFO impl.YarnClientImpl: Submitted application application_1532056892547_0003

18/07/23 15:41:47 INFO mapreduce.Job: The url to track the job: http://hadoop3:8088/proxy/application_1532056892547_0003/

18/07/23 15:41:47 INFO mapreduce.Job: Running job: job_1532056892547_0003

18/07/23 15:41:53 INFO mapreduce.Job: Job job_1532056892547_0003 running in uber mode : false

18/07/23 15:41:53 INFO mapreduce.Job:  map 0% reduce 0%

18/07/23 15:41:58 INFO mapreduce.Job:  map 100% reduce 0%

18/07/23 15:42:03 INFO mapreduce.Job:  map 100% reduce 100%

18/07/23 15:42:04 INFO mapreduce.Job: Job job_1532056892547_pleted successfully

18/07/23 15:42:05 INFO mapreduce.Job: Counters: 49

	File System Counters

		FILE: Number of bytes read=50

		FILE: Number of bytes written=376437

		FILE: Number of read operations=0

		FILE: Number of large read operations=0

		FILE: Number of write operations=0

		HDFS: Number of bytes read=510

		HDFS: Number of bytes written=215

		HDFS: Number of read operations=11

		HDFS: Number of large read operations=0

		HDFS: Number of write operations=3

	Job Counters

		Launched map tasks=2

		Launched reduce tasks=1

		Data-local map tasks=2

		Total time spent by all maps in occupied slots (ms)=5283

		Total time spent by all reduces in occupied slots (ms)=2804

		Total time spent by all map tasks (ms)=5283

		Total time spent by all reduce tasks (ms)=2804

		Total vcore-milliseconds taken by all map tasks=5283

		Total vcore-milliseconds taken by all reduce tasks=2804

		Total megabyte-milliseconds taken by all map tasks=5409792

		Total megabyte-milliseconds taken by all reduce tasks=2871296

	Map-Reduce Framework

		Map input records=2

		Map output records=4

		Map output bytes=36

		Map output materialized bytes=56

		Input split bytes=274

		Combine input records=0

		Combine output records=0

		Reduce input groups=2

		Reduce shuffle bytes=56

		Reduce input records=4

		Reduce output records=0

		Spilled Records=8

		Shuffled Maps =2

		Failed Shuffles=0

		Merged Map outputs=2

		GC time elapsed (ms)=219

		CPU time spent (ms)=3030

		Physical memory (bytes) snapshot=752537600

		Virtual memory (bytes) snapshot=6612717568

		mitted heap usage (bytes)=552075264

	Shuffle Errors

		BAD_ID=0

		CONNECTION=0

		IO_ERROR=0

		WRONG_LENGTH=0

		WRONG_MAP=0

		WRONG_REDUCE=0

	File Input Format Counters

		Bytes Read=236

	File Output Format Counters

		Bytes Written=97

Job Finished in 18.492 seconds

Estimated value of Pi is 3.80000000000000000000
在job执行的时候,可以查看resourcemangerweb端的8088端口,上面可以看到job的完成进度
再执行一个word count任务
可以执行字母统计,将hdfs中的wordcount文件统计,并将结果输出到wordcount-to-output

[hadoop@10-124-147-22 hadoop]$ hadoop jar share/hadoop/mapreduce/hadoop-mapreduce-examples-2.7.6.jar wordcount /wordcount /wordcount-to-output

18/07/23 15:45:12 INFO input.FileInputFormat: Total input paths to process : 1

18/07/23 15:45:13 INFO mapreduce.JobSubmitter: number of splits:1

18/07/23 15:45:13 INFO mapreduce.JobSubmitter: Submitting tokens for job: job_1532056892547_0004

18/07/23 15:45:13 INFO impl.YarnClientImpl: Submitted application application_1532056892547_0004

18/07/23 15:45:13 INFO mapreduce.Job: The url to track the job: http://hadoop3:8088/proxy/application_1532056892547_0004/

18/07/23 15:45:13 INFO mapreduce.Job: Running job: job_1532056892547_0004

18/07/23 15:45:19 INFO mapreduce.Job: Job job_1532056892547_0004 running in uber mode : false

18/07/23 15:45:19 INFO mapreduce.Job:  map 0% reduce 0%

18/07/23 15:45:23 INFO mapreduce.Job:  map 100% reduce 0%

18/07/23 15:45:29 INFO mapreduce.Job:  map 100% reduce 100%

18/07/23 15:45:29 INFO mapreduce.Job: Job job_1532056892547_pleted successfully

18/07/23 15:45:29 INFO mapreduce.Job: Counters: 49

	File System Counters

		FILE: Number of bytes read=197

		FILE: Number of bytes written=250631

		FILE: Number of read operations=0

		FILE: Number of large read operations=0

		FILE: Number of write operations=0

		HDFS: Number of bytes read=264

		HDFS: Number of bytes written=140

		HDFS: Number of read operations=6

		HDFS: Number of large read operations=0

		HDFS: Number of write operations=2

	Job Counters

		Launched map tasks=1

		Launched reduce tasks=1

		Data-local map tasks=1

		Total time spent by all maps in occupied slots (ms)=2492

		Total time spent by all reduces in occupied slots (ms)=3007

		Total time spent by all map tasks (ms)=2492

		Total time spent by all reduce tasks (ms)=3007

		Total vcore-milliseconds taken by all map tasks=2492

		Total vcore-milliseconds taken by all reduce tasks=3007

		Total megabyte-milliseconds taken by all map tasks=2551808

		Total megabyte-milliseconds taken by all reduce tasks=3079168

	Map-Reduce Framework

		Map input records=12

		Map output records=24

		Map output bytes=275

		Map output materialized bytes=197

		Input split bytes=85

		Combine input records=24

		Combine output records=13

		Reduce input groups=13

		Reduce shuffle bytes=197

		Reduce input records=13

		Reduce output records=13

		Spilled Records=26

		Shuffled Maps =1

		Failed Shuffles=0

		Merged Map outputs=1

		GC time elapsed (ms)=155

		CPU time spent (ms)=2440

		Physical memory (bytes) snapshot=465940480

		Virtual memory (bytes) snapshot=4427837440

		mitted heap usage (bytes)=350224384

	Shuffle Errors

		BAD_ID=0

		CONNECTION=0

		IO_ERROR=0

		WRONG_LENGTH=0

		WRONG_MAP=0

		WRONG_REDUCE=0

	File Input Format Counters

		Bytes Read=179

	File Output Format Counters

		Bytes Written=140
执行结果
[hadoop@10-124-147-22 hadoop]$ hadoop fs -ls /

Found 5 items

drwxrwx---   - hadoop supergroup          0 2018-07-20 11:21 /tmp

drwxr-xr-x   - hadoop supergroup          0 2018-07-20 11:47 /user

-rw-r--r--   3 hadoop supergroup        179 2018-07-20 11:22 /wordcount

drwxr-xr-x   - hadoop supergroup          0 2018-07-23 15:45 /wordcount-to-output

[hadoop@10-124-147-22 hadoop]$ hadoop fs -ls /wordcount-to-output

Found 2 items

-rw-r--r--   3 hadoop supergroup          0 2018-07-23 15:45 /wordcount-to-output/_SUCCESS

-rw-r--r--   3 hadoop supergroup        140 2018-07-23 15:45 /wordcount-to-output/part-r-00000

[hadoop@10-124-147-22 hadoop]$ hadoop fs -cat /wordcount-to-output/part-r-00000

datanode	1

elasticsearch	1

hadoop	1

hdfs	1

hello	12

journalnode	1

mongo	1

mysql	1

namenode	1

nodemanager	1

resourcemanager	1

world	1

yarn	1
Namenode ports: 50470 --> 9871, 50070 --> 9870, 8020 --> 9820

Secondary NN ports: 50091 --> 9869, 50090 --> 9868

Datanode ports: 50020 --> 9867, 50010 --> 9866, 50475 --> 9865, 50075 --> 9864

KMS service :16000 --> 9600
同时变更的还有slaves文件,在hadoop2中的slaves文件在hadoop3中变成works文件
生产中hadoop集群里面的datanode一般都是几百上千台主机,实际上生产中的datanode都是在各自主机中自行单独启动,并不是直接通过namenode进行启动,所以上面4.3.7中的ssh-key在实际生产中并不无那么多需求。同时journalnode虽然消耗资源小,但是一般也不与datanode分布于同一台主机中。
以上就是关于gg修改器root环境_gg修改器root怎么用的全部内容,感谢大家的浏览观看,如果你喜欢本站的文章可以CTRL+D收藏哦。
gg游戏修改器怎样修改网游,gg游戏修改器:改变你的游戏体验 大小:16.84MB9,304人安装 你是否曾经为游戏中遇到的困难而烦恼?是否曾经为游戏中的道具难以获得而感到苦恼?……
下载
gg修改器无root权限,什么是gg修改器? 大小:12.35MB9,453人安装 赞美gg修改器无root权限,让你轻松畅玩游戏 gg修改器是一款安卓游戏修改工具,可以……
下载
gg修改器都需要root吗,GG修改器是否需要root? 大小:5.96MB9,255人安装 关键词: gg修改器,rootGG修改器是一款非常实用的工具,在电子竞技和游戏领域中被……
下载
gg修改器中文版咋用,gg修改器中文版使用方法 大小:12.18MB9,748人安装 如果你是一个游戏玩家,那么你一定听说过gg修改器。gg修改器是一款针对Android游戏……
下载
gg修改器需要root嘛,GG修改器不需要ROOT权限 大小:10.85MB9,614人安装 GG修改器是一款非常好用的游戏修改软件,很多玩家都非常热爱它。与其他游戏修改器不……
下载
gg修改器秒root版本_gg修改器免root版使用教程 大小:11.05MB10,713人安装 大家好,今天小编为大家分享关于gg修改器秒root版本_gg修改器免root版使用教程的内……
下载
gg修改器root获取视频_gg修改器root教程视频 大小:12.51MB10,697人安装 大家好,今天小编为大家分享关于gg修改器root获取视频_gg修改器root教程视频的内容……
下载
gg修改器显示未root,修改手机游戏无需root,gg修改器成为玩家的利器 大小:15.87MB9,760人安装 对于手机游戏爱好者而言,修改器是一项十分必要的工具。然而,在过去,玩家必须拥有……
下载
魅族手机gg修改器root开启,神器!魅族手机gg修改器root开启,让你摆脱束缚 大小:15.31MB9,935人安装 魅族手机gg修改器root开启是我用过的最神奇的一款软件之一,让我体验到了另一种手机……
下载
gg修改器 免root方法,介绍GG修改器 大小:8.27MB9,641人安装 GG修改器是一款在移动游戏中非常流行的工具。它允许玩家在游戏中修改各种数值,以获……
下载